RSS Feed

Tag Archives: cookie

Baked Cookie Oatmeal

Posted on

This is the best breakfast you will ever eat!

Baked-Cookie-Oatmeal-Above

So, maybe that was a bit of an exaggeration, but only a little, teeny tiny bit! See, this is not ordinary oatmeal. I eat lots of oatmeal and try lots of oatmeal recipes. There are lots of flavor variations on oatmeal, but it all tastes like oats + toppings (not that this is a bad thing – I love oatmeal). This oatmeal tastes like a cookie. And, get this, no added sugar (except for what is in the chocolate chips – but there are substitutions, just keep reading)! Did you get that? Sugar free oatmeal that legitimately tastes like a cookie!

Baked-Cookie-Oatmeal-Close

Okay, okay, so let me mention a few practical things about this recipe. I found this recipe a few months ago on The Nutritious Kitchen. I made it, with a few convenient substitutions. I also misread the amount of honey – opps! Turns out increasing the honey is totally delicious, and I have to eat a tablespoon of local honey every day for my allergies anyway – why not get it in cookie oatmeal form?!

The base of this recipe is oatmeal and unsweetened applesauce. The cookie flavor comes from honey, peanut butter, and vanilla extract. Almond flour adds to the texture and provides a bit more sweetness. Admittedly, with the honey, peanut butter, and almond flour this recipe is a bit high calorie, even though it’s all clean ingredients. If you’re like my spouse and can eat whatever the heck you want and never gain a pound then go for the larger batch. If you’re like me, and need to be diligent about what you eat to maintain a healthy weight then make the smaller batch. Since this oatmeal is full of whole grains and protein you’ll be full until lunch even with the small batch.

Of course, there are lots of ingredient substitutions you can make. I’ve used all purpose flour instead of almond flour a few times – I prefer the almond flour, but a GF all purpose flour will lower the calories and price point for this breakfast. The peanut butter can be generic brand, all natural, or even any other nut butter. I use regular chocolate chips, but the Enjoy life chocolate chips will cut out all refined sugar from the recipe. Cacao nibs are totally sugar free options. Honestly, this would still be good without chocolate chips! Choose the modifications that suit your diet and health and then go make this oatmeal!

Baked-Oatmeal-Both

Baked Cookie Oatmeal

Thanks a million times to Selena at The Nutritious Kitchen for the recipe inspiration!

Ingredients for larger batch (about 550 calories)
  • 1/2 c Gluten Free oatmeal (be sure to make sure you choose a brand that is certified GF)
  • 6 Tablespoons unsweetened applesauce
  • 2 Tbs peanut butter
  • 2 Tbs local honey
  • 1/2 tsp baking powder
  • 2 Tbs almond flour or almond meal
  • 1 tsp vanilla extract
  • 19 chocolate chips (yes, 19. That seems to be the perfect ration)
Ingredients for smaller batch (about 325 calories)
  • 1/3 c Gluten Free Oatmeal (be sure to make sure you choose a brand that is certified GF)
  • 5 Tbs unsweetened applesauce
  • 1 Tbs peanut butter
  • 1 Tbs local honey
  • 1/2 tsp baking powder
  • 1 Tbs almond flour or almond meal
  • 3/4 tsp vanilla extract
  • 10 chocolate chips
Directions
  1. In a small ramekin, mix the unsweetened applesauce, peanut butter, honey, and vanilla extract (I often mix this the night before, refrigerate, and have less to do in the morning).
  2. Preheat the oven to 350° F.
  3. Stir in the oats, baking powder, and almond meal/flour. Once all mixed, stir in the chocolate chips.
  4. Bake for 15 minutes.
  5. Eat and Enjoy 🙂

Flourless Chocolate Peanut Butter Reese’s Stuffed Cookies

Posted on

This is a because-I-bought-a-bunch-of-Easter-candy-on-sale-and-won’t-just-eat-candy recipe.

Flourless-Peanut-Butter-Chocolate-Reese's-Stuffed-Cookies-Front

I’ve never been a big candy eater. I was the kid who spent more time sorting and trading my halloween candy than actually eating. In October, my Dad would have us clean out the uneaten candy from the previous Halloween before we went trick or treating again. Apparently kids + uneaten candy is abnormal. That was news to me. Now, I feel guilty just eating some candy. I guess something about putting it in a cookie makes me feel better, like I’m getting more for my calories.

So, yes, Sunday was Easter and that meant that on Monday I was scouring the stores looking for post Easter bargains. I had the best luck at a semi-sketchy grocery store just up the road and Aldi. I scored a bunch of bags of bite sized candy bars for between 50% and 75% off. Mostly, Steve will eat the candy over the next few months. For my fun, I decided to bake with it. And, truthfully, the bargain hunting for the candy in the first place was pretty fun, too.

These cookies are flourless. It’s great for anyone on a GF diet, and an excellent choice for anyone who isn’t familiar with GF baking but wants to bake for someone with a gluten intolerance. There are no crazy, expensive flours in the recipe and all of the ingredients are pretty normal items in the pantry (except the reese’s). The dough whips up in 5 minutes in a stand mixer, and just a minute or two more if you stir it by hand.

Flourless-Peanut-Butter-Chocolate-Reese's-Stuffed-Cookies-1

I love that these cookies are double chocolate and double peanut butter. The best dessert combination x 2! The cookie base has cocoa powder and peanut butter before even adding in the reese’s candy. The baked cookies end up having an mouthwatering swirl of reese’s. Any peanut butter and chocolate lover will enjoy these cookies, whether they are on a GF diet or not!

Flourless-Peanut-Butter-Chocolate-Reese's-Stuffed-Cookies-2

P.S. If you like these cookies, try these other flourless cookie recipes:

Flourless Peanut Butter Chocolate Chip Cookies

Flourless Chocolate Pretzel Cookies

Flourless m&m Cookies

Flourless Peanut Butter Chocolate Reese’s Stuffed Cookies

Ingredients
  • 1 c creamy peanut butter
  • 1 c brown sugar
  • 1/2 c cocoa powder
  • 1 large egg
  • 1 tsp baking soda
  • 1 tsp vanilla extract (I use imitation vanilla)
  • 1 c roughly chopped Reese’s eggs/cup (I used 8 Reese’s eggs to get 1 c)
Directions
  1. Preheat oven to 350° F.
  2. Using a stand mixer with the paddle attachment (or with a strong arm and a spoon) mix the peanut butter, brown sugar, cocoa powder, egg, baking soda, and vanilla until very well combined.
  3. Stir in the chopped Reese’s, gently.
  4. Prepare a cookie sheet with a silicone baking mat or parchment paper.
  5. Roll 1-2 tablespoons of dough into a balls and place them about 2 inches apart on the baking sheet. I got 24 balls out of the dough, spread over 2 baking sheets.
  6. Bake for 12 minutes, rotating the baking sheets at the halfway point.
  7. The cookies will still be soft when you remove them from the oven, but will firm up. Be careful not to over cook, the dark color from the cocoa powder can be deceiving!


GF Peanut Butter M&M Cookies

Posted on

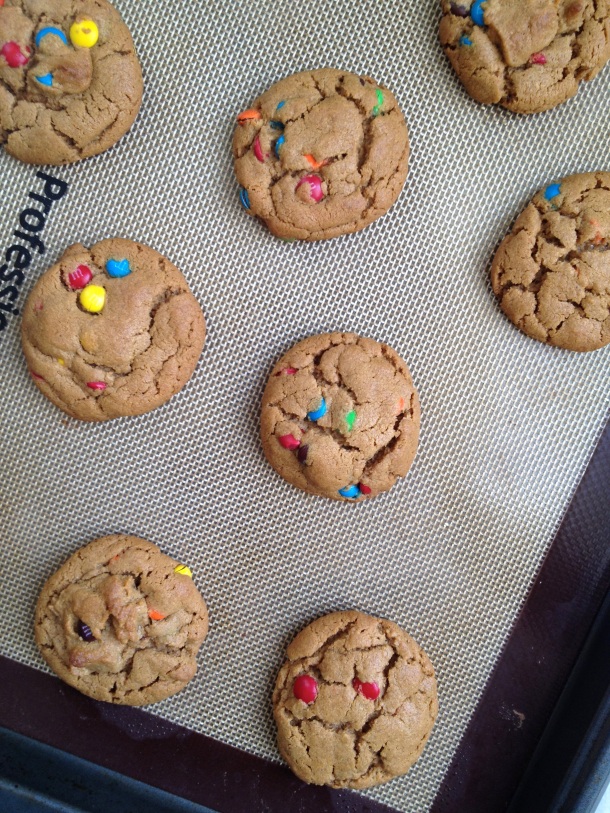
I’ve really been craving an m&m cookie. Not just today, or this week, but for months! When you eat GF you can’t just go to the store and buy some m&m cookies. You’ve gotta make them. So I did! And they were delicious and worth the wait!

Gluten-Free-M&M-Cookie-Sq

For how much I enjoy cooking, I really don’t enjoy getting out a dozen different flours/starches just to make some cookies. When I open the flour bags, a big cloud of flour always appears, and then ends up all over my shirt. No matter how hard I try to be careful and clean the counter top still ends up with a white flour coating. This is why most of my baking recipes are very simple, and my eBook only uses all purpose GF flour. Less flours = less chance for a mess.

I was thinking over how to make a GF m&m cookie without messing around with lots of flours. I had a few ideas, but the quickest and easiest was to use my Peanut Butter Cookie as the base of the recipe. With only 5 ingredients, none of which are flour, you can’t get much simpler! Especially for a gluten free cookie!

Peanut-Butter-m&m-Cookie-Sheet

With the exception of the m&ms, the five ingredients in these cookies are all pantry staples. Maybe other people keep m&ms on hand, but I don’t. And, being the thrifty shopper that I am, I waited for m&ms to go on sale before I bought them for this recipe. I was really ready for an m&m cookie by time I actually got around to making them.

It’s easy to whip up a batch in under half and hour, start to finish. Great for a last minute dessert or when you want to impress with soft, warm, freshly baked cookies and don’t have time for something complicated. Enjoy!

Peanut-Butter-m&m-Cookie-Tall

Gluten Free Peanut Butter M&M Cookies

Ingredients
  • 1 c creamy peanut butter
  • 3/4 c brown sugar
  • 1 egg
  • 1 tsp vanilla extract
  • 1 tsp baking soda
  • 1/2 c mini m&ms
Directions
  1. Preheat oven to 350° F.
  2. Mix the first 5 ingredients (you can do this by hand or in a stand mixer. I used my KitchenAid with the paddle attachment).
  3. Stir in the mini m&ms.
  4. Rill a spoonful of dough (about 1-2 tablespoons, but you can approximate) into a ball in the palm of your hand. If the dough is sticking too much run your hands under cold water, shake dry, and then try working with the dough again. Place the balls on a non stick baking sheet, or a regular baking sheet lined with parchment paper or a silpat mat.
  5. Bake for about 12 minutes total, rotating the pan halfway through the baking time. The cookies should be set and golden brown on the bottom but still soft on the top. Let the cookies cool on the baking sheet for a few minutes, then transfer them to a cooling rack or eat!


Chocolate Peppermint Bark Cookies

Posted on

I know this is probably the millionth peppermint recipe you’ve seen this week, but these cookies are so good!

Peppermint Bark Cookies 1

The inspiration for this recipe came from Brittany at Real Sustenance. She creates awesome recipes that are allergen free (check out her blog – it’s a great resource)! The particular peppermint bark cookie I spotted on her site is gluten, dairy, soy, and egg free, and because of that there were a few extra steps and ingredients that I wasn’t used to in baking.

Peppermint Bark Cookies 4

I’m all for cooking and baking to meet your specific needs so I decided to create an only GF peppermint bark cookie. I took the idea and ran with it, and many, many batches later ended up with these cookies. These peppermint cookies been a big hit with everyone, not just people who eat gluten free. They’re the closest to a gluten free thin mint that I have tasted, so that’s a winner for me! Everyone who eats them loves them, including people who don’t usually like mint!

Peppermint Bark Cookies 2

Since these cookies disappear quickly I’ve tried to steamline the recipe to make it quick and simple. One of the ways I do that is by using melted chocolate chips for the coating. I know peppermint bark usually uses white chocolate but I just hate working with that stuff! It always seems so much harder to melt than regular chocolate. Since these cookies are a frequent baked good in my house and I always have chocolate chips on hand that’s what I use. These are delicious with white or dark chocolate too, and would look great with a red or green coating, too!

Peppermint Bark Cookies 3

Chocolate Peppermint Bark Cookies

makes about 4 dozen cookies, depending on size.
 
Ingredients
  • 2 c almond meal (I make this by grinding up almonds in my food processor)
  • 1/2 c cocoa powder
  • 1/2 c granulated sugar
  • 3 tsp peppermint extract
  • 1/2 tsp baking powder
  • 1/4 c water
  • melted chocolate chips (about 1 bag)
  • 6 peppermint hard candies, crushed
Directions
  1. Preheat oven to 350° F.
  2. Mix the first six ingredients in a bowl.
  3. Roll the dough (starting with about half of it)  between two pieces of wax or parchment paper, to 1/8″ thick. Cut out cookies using a small circle cookie cutter. Place cookies on a baking sheet lined with parchment paper or a silicone baking mat. Repeat until all of the dough has been used. The cookies will not expand at all during baking so you can put them very close together on the baking sheet.
  4. Bake the cookies for 10 minutes, rotating the pan halfway through.
  5. Let the cookies cool on the baking sheet. They will firm up as they cool.
  6. Put the chocolate chips in a deep bowl and microwave for 30 second increments until melted.
  7. To coat cookies, get out a fork and a knife. Gently press a cookie down into the melted chocolate, then flip it over with the fork and knife. With the fork in your left hand, slide it underneath the cookie and lift out of the chocolate. Use the knife to scrape excess chocolate from the top of the cookie and then the bottom on the cookie. Place the cookie gently on the cookie sheet, using the knife to guide it off of the fork.
  8. Top with a pinch of the crushed peppermint candy.
  9. Repeat until all cookies have been coated, then place the cookie sheet in the refrigerator to let chocolate harder.
  10. Store cookies in an airtight container in the refrigerator.

The eBook is Here! (Sample Recipe + A Giveaway)

Posted on

I’m very excited to announce that the Portionally Gluten Free Cookies eBook is here! Click here to purchase now or scroll down for a preview recipe.

This eBook is different than the usual gluten free cookbook.  Rather than only giving you gluten free recipes I’ve included measurements to split your holiday baking into partial batches. Each cookie recipe has directions to make either a quarter, half, or entire batch gluten free. The rest of the batch will be made with regular wheat flour. I call this “Portionally Gluten Free” (You can find more info about Portionally Gluten Free here and a list of PGF and a list of PGF recipes at the bottom of this page).

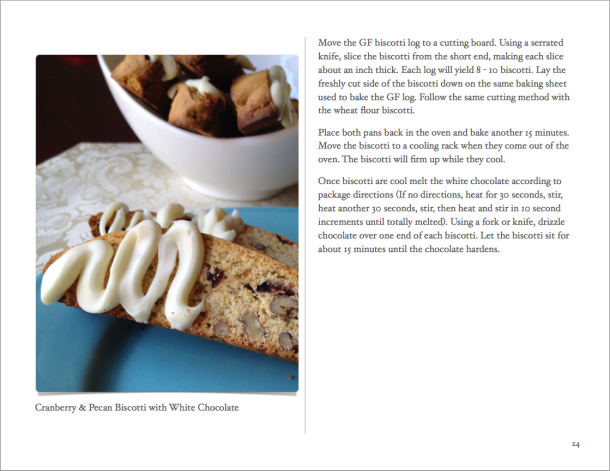
To give you an idea of what the cookbook is like, here is the recipe for Cranberry & Pecan Biscotti with White Chocolate. Click on the images to expand the recipe.

Screen Shot 2013-12-09 at 12.32.33 PM

Screen Shot 2013-12-09 at 12.32.42 PM

Screen Shot 2013-12-09 at 1.23.25 PMScreen Shot 2013-12-09 at 1.23.41 PM

This cookbook features:

  • 8 cookie recipes that will make a portion of the batch GF and a portion of the batch with wheat flour.
  • Step by step instructions on how to split each cookie batch safely.
  • 4 size options for what portion of the batch will be made GF.
  • Thorough directions on how to safely prepare GF and gluten containing foods in the same kitchen.
  • 2 naturally GF cookie recipes.

The Portionally Gluten Free Cookies eBook is a great baking tool for both the seasoned GF chef or anyone brand new to GF baking. Anyone in a family with only some family members on a GF diet will appreciate this baking technique. Hosts and hostesses trying to accommodate friends and family on a GF diet will also enjoy having both the recipes and safe preparation techniques at their fingertips for holiday entertaining.

To enter the giveaway to win a copy of the eBook leave a comment sharing what types of Christmas cookies you are baking this year. I’ll choose the winner at random and announce who it is next week. (If you’re already purchased the eBook, I will issue you a refund via PayPal).

Use the eBook for your own holiday baking or purchase as a gift for a friend. Through December eBook will be on sale for $1.99 so be sure to get your copy before the price goes up! Click here to purchase, or use the link below.

Buy Now – $1.99

Chocolate Peanut Butter Pretzel Cookies (GF)

Posted on

Here’s the deal with these cookies: They are amazingly delicious!

Flour-less peanut butter cookies are a wonderful thing for anyone on a GF diet. So tasty, so simple, and maintaining all the qualities anyone thinks of a normal cookie having. Why even bother with mixing all of those expensive flours when you can combine some PB, sugar, and eggs and end up with a perfect cookie? These cookies take the basic flour-less PB cookie to another level. Adding cocoa powder gives the whole cookie a chocolatey flavor. And the pretzels make the cookie. The slight crunch and saltiness from the pretzels combined with the soft chocolate and peanut butter dough is mouthwatering.

IMG_5670

I decided to bake these cookies on Tuesday afternoon. I bake a minimum of once a week in the hope of improving my baking skills. Sometimes my weekly baking is a flop (Like, two weeks ago, when I melted candy corn into cookies (accidentally) and the entire pan turned to mush). Other times, the baking is a success. In the mood for a success, I figured a modification of my Flour-less Peanut Butter Cookies recipe would surely lead sometime edible.

Once the cookies came out of the oven and had cooled for a few minutes and ate one and was happy with the results. Chocolate, peanut butter, pretzel – I knew that combination couldn’t turn out badly! Steve got home from work and a little while later and was excited to see the cookies and gobbled down a bunch. How that guy eats so many cookies and stays so slim I do not know!

On Tuesdays we go to the climbing gym with some people, and I often bring desserts. We packed up all but four of the remaining cookies and were handing them out to our climbing friends. People were really loving these cookies. Almost everyone took seconds. One lady said it was the best cookie she ever had. Everyone was talking about the cookies and asking me how to make them. We got home from climbing, hungry, and finished off the remaining few cookies. Yup, all the cookies eaten in one day, really, one half of a day. That’s proof of how amazing these cookies are!

The coolest part is that these are so simple to make compared to other GF baked goods. Since these cookies are flour-less you don’t have to measure out half a dozen different flours. In fact, the ingredient list is short, and consists of basic ingredients you probably keep on hand. With a stand mixer, you can be done mixing up the cookie dough in under 10 minutes and then its just shaping the cookies and baking them. These cookies are a great last minute dessert. You can whip up a batch quickly and easily and you’ll still get that “wow” factor from everyone who tries them!

Flour-less Chocolate Peanut Butter Pretzel Cookies

 
Ingredients (makes about 20 cookies)
  • 1c creamy peanut butter
  • 1c brown sugar, packed
  • 1/2c unsweetened cocoa powder
  • 1 egg
  • 1 tsp vanilla extract
  • 1 tsp baking soda
  • 1/2c GF pretzels, broken into small pieces (I used Glutino’s pretzels)
Baking Directions
  1. Preheat oven to 350° F.
  2. In the bowl of a stand mixer (if you don’t have a stand mixer just use a large bowl and mix by hand) add all ingredients except the pretzel pieces.
  3. Mix on medium speed, with the paddle attachment, until all ingredients are thoroughly combined. Scrape down the bowl a few times if needed.
  4. Add in the pretzel pieces and stir into the dough on the lowest mixer setting, or by hand.
  5. If desired, refrigerate the dough for about half an hour. (I prefer to work with cooled cookie dough, but this step isn’t necessary)
  6. Using your hands, shape the dough into cookie shapes. These cookies will not expand, so the size you shape them is the size they will stay. If larger pretzel chunks are falling out of the dough as your shape the cookies, but just shove them back in.
  7. Place cookies on 2 baking sheets lined with either parchment paper or silpat. Since the cookies won’t expand, you can place them fairly close together on the baking sheets.
  8. Bake for 8-12 minutes, and then let the cookies cool on the pan for a few minutes before moving them to a cooling rack. The cookies will be very soft on top when you first take them out of the oven. The key to knowing they are done baking is to watch for the bottom and sides to set.

Mini Halloween “Oreo” Truffles

Posted on

My sister was visiting last week! We some big plans (going to an aquarium) and some not so big plans (eating snacks). We had a night full of popcorn experiments, and then the next day we wanted to make something special for Halloween. We brainstormed for a while and then decided on these Oreo truffles in Halloween shapes. We realized that our cookie decorating skills aren’t the best, but we had fun (and isn’t that what matters?)! Plus, these cookies do not need to be baked, so even though we cut out and decorated each tiny cookie the time commitment was not huge, and there weren’t a bunch of cookie sheets that needed to be washed! Recipes that don’t result in a million dirty dishes are usually my favorites!

Have you had Oreo truffles before? They are a Christmas tradition for my family. My Dad and I used to make them on Christmas Eve and bring them to our family festivities. My family has always had the job of providing all the different cookie varieties. There was a year when my Dad and I decided to switch it up and replace the Oreo truffles with something else. Well, no one liked that! A few family members said that they wait all year for those cookies!

Making Oreo truffles is so simple. Mix Oreos, or GF oreos in the case of this recipe, with cream cheese in a food processor. To make regular truffles you roll the mixture into balls and then coat them with melted chocolate. Instead of making balls, we rolled the dough out to cut out Halloween shapes.

I rolled the dough out on wax paper, for easy clean up and less sticking. Since I don’t have any Halloween cookie cutters we improvised with a bottle cap and a dough cutter.

Making spiders is simple; you just cut out a circle with a bottle cap. We made the legs by piping on melting chocolate. The ghosts we a bit more complicated. First, I cut out a half circle using the bottle cap.

Next, use the pastry cutter, or a pizza cutter, to extend the cut straight down.

IMG_6187

If you want, you can leave the ghost in this shape or use the pastry/pizza cutter to cut a few diagonal lines.

One all of the cookie shapes were cut we just “frosted” and decorated  them with melted chocolate and white chocolate. Hopefully our finished cookies resemble ghosts and spiders. I have not spent a lot of time frosting and decorating so this project was a stretch for me! I’m sure many of you out there have great decorating skills and could use this same idea to create some really amazing looking cookies. Looks aside, these cookies taste decadent, and since they a mini you don’t have to feel badly if you eat a few!

Mini Halloween Oreo Truffles

 
Ingredients
  • 1 package (10.5 oz) gluten free oreo cookies (I used Glutino brand)
  • 2 oz cream cheese
  • 4 oz white melting chocolate
  • 4 oz chocolate chips
Baking Directions
  1. Combine oreos and cream cheese in a food processor. Mix for a few minutes, until fully combined. The mixture will look brown.
  2. Roll or pat out the dough to about a 1/8″ thick.
  3. Cut out cookie shapes from the dough (see post above for how to make ghost and spider shapes using a bottle cap).
  4. Put the dough in the freezer to firm up, 5-10 minutes will be enough.
  5. Melt both chocolate varieties according to package directions.
  6. Top the ghost cookies with the white chocolate and spiders with regular melted chocolate. Use the opposite colors for eyes and mouths.
  7. Using a ziplock bag or a pastry bag, pipe melted chocolate off of each spider body to create legs.
  8. Once all decorating is done return cookies to the freezer again. Store in the freezer until you are ready to serve.