RSS Feed

Tag Archives: grill

Buffalo Ranch Turkey Burgers

Posted on

I kid you not, I have been trying to get a good picture of these burgers for a year now. There’s something about taking a picture of a burger without a bun that makes it non-photogenic. In the gluten free world, burgers without buns are just a reality, photogenic or not. I managed to get few good photos of these Pizza Burgers, but they had fancy toppings to make them look good. Dousing a burger in hot sauce isn’t exactly food styling. I’ve finally given up on the idea of getting a good photo of these burgers. I could wait until I somehow managed the perfect photo, but I’d rather just post the recipe already!

Buffalo-Ranch-Burgers-Stacked

By now I’m sure you know that I love grilling in the summer. I make turkey burgers often. They are a quick and tasty homemade meal, what’s not to love? Burgers are a blank slate for so many flavors. Think the creativity of the Red Robin menu + homemade, real ingredients. Steve loves these Sweet Thai Chili Burgers, but these Buffalo Ranch Burgers are my favorite. I often split a pound of lean ground turkey in half and make us each a few burgers of our flavor choice.

I promise you that this one “secret ingredient” will make your turkey burgers moist and juicy. Lean turkey + caramelized onions creates nearly an identical burgers to much fattier ground beef. Really, it’s hardly a secret and hardly difficult to add caramelized onions to your turkey burgers. It does take a bit of time, but most of that is inactive; just occasional stirring. I just caramelize the onions on the stove top while I prepare the rest of the burger ingredients.

Buffalo-Ranch-Turkey-Burger-Square

For the ranch flavor in these burgers I use dried ranch seasoning mix. If you’re using the store bought ranch mix in the packets you’ll want to make sure that you find a gluten free variety. The Hidden Valley ranch packets will all list if they are gluten free on the package. Just look under the ingredient label. If it’s gluten free it will say “gluten free” right there! Lately, I’ve been using homemade ranch seasoning mix with great success. This recipe from Gimme Some Oven has given me good results. In my last batch, I left out the onion flakes and dried chives (I didn’t have either in my pantry) and still had great results!

I use Frank’s Red Hot Sauce for the buffalo flavor. The sauce gets added while the burgers are cooking, and then I give it a drizzle before serving. If you drench the burgers in hot sauce it will be difficult to taste the ranch flavor. With that warning in mind, add as much hot sauce as you’d like!

Buffalo-Ranch-Burgers-Grill

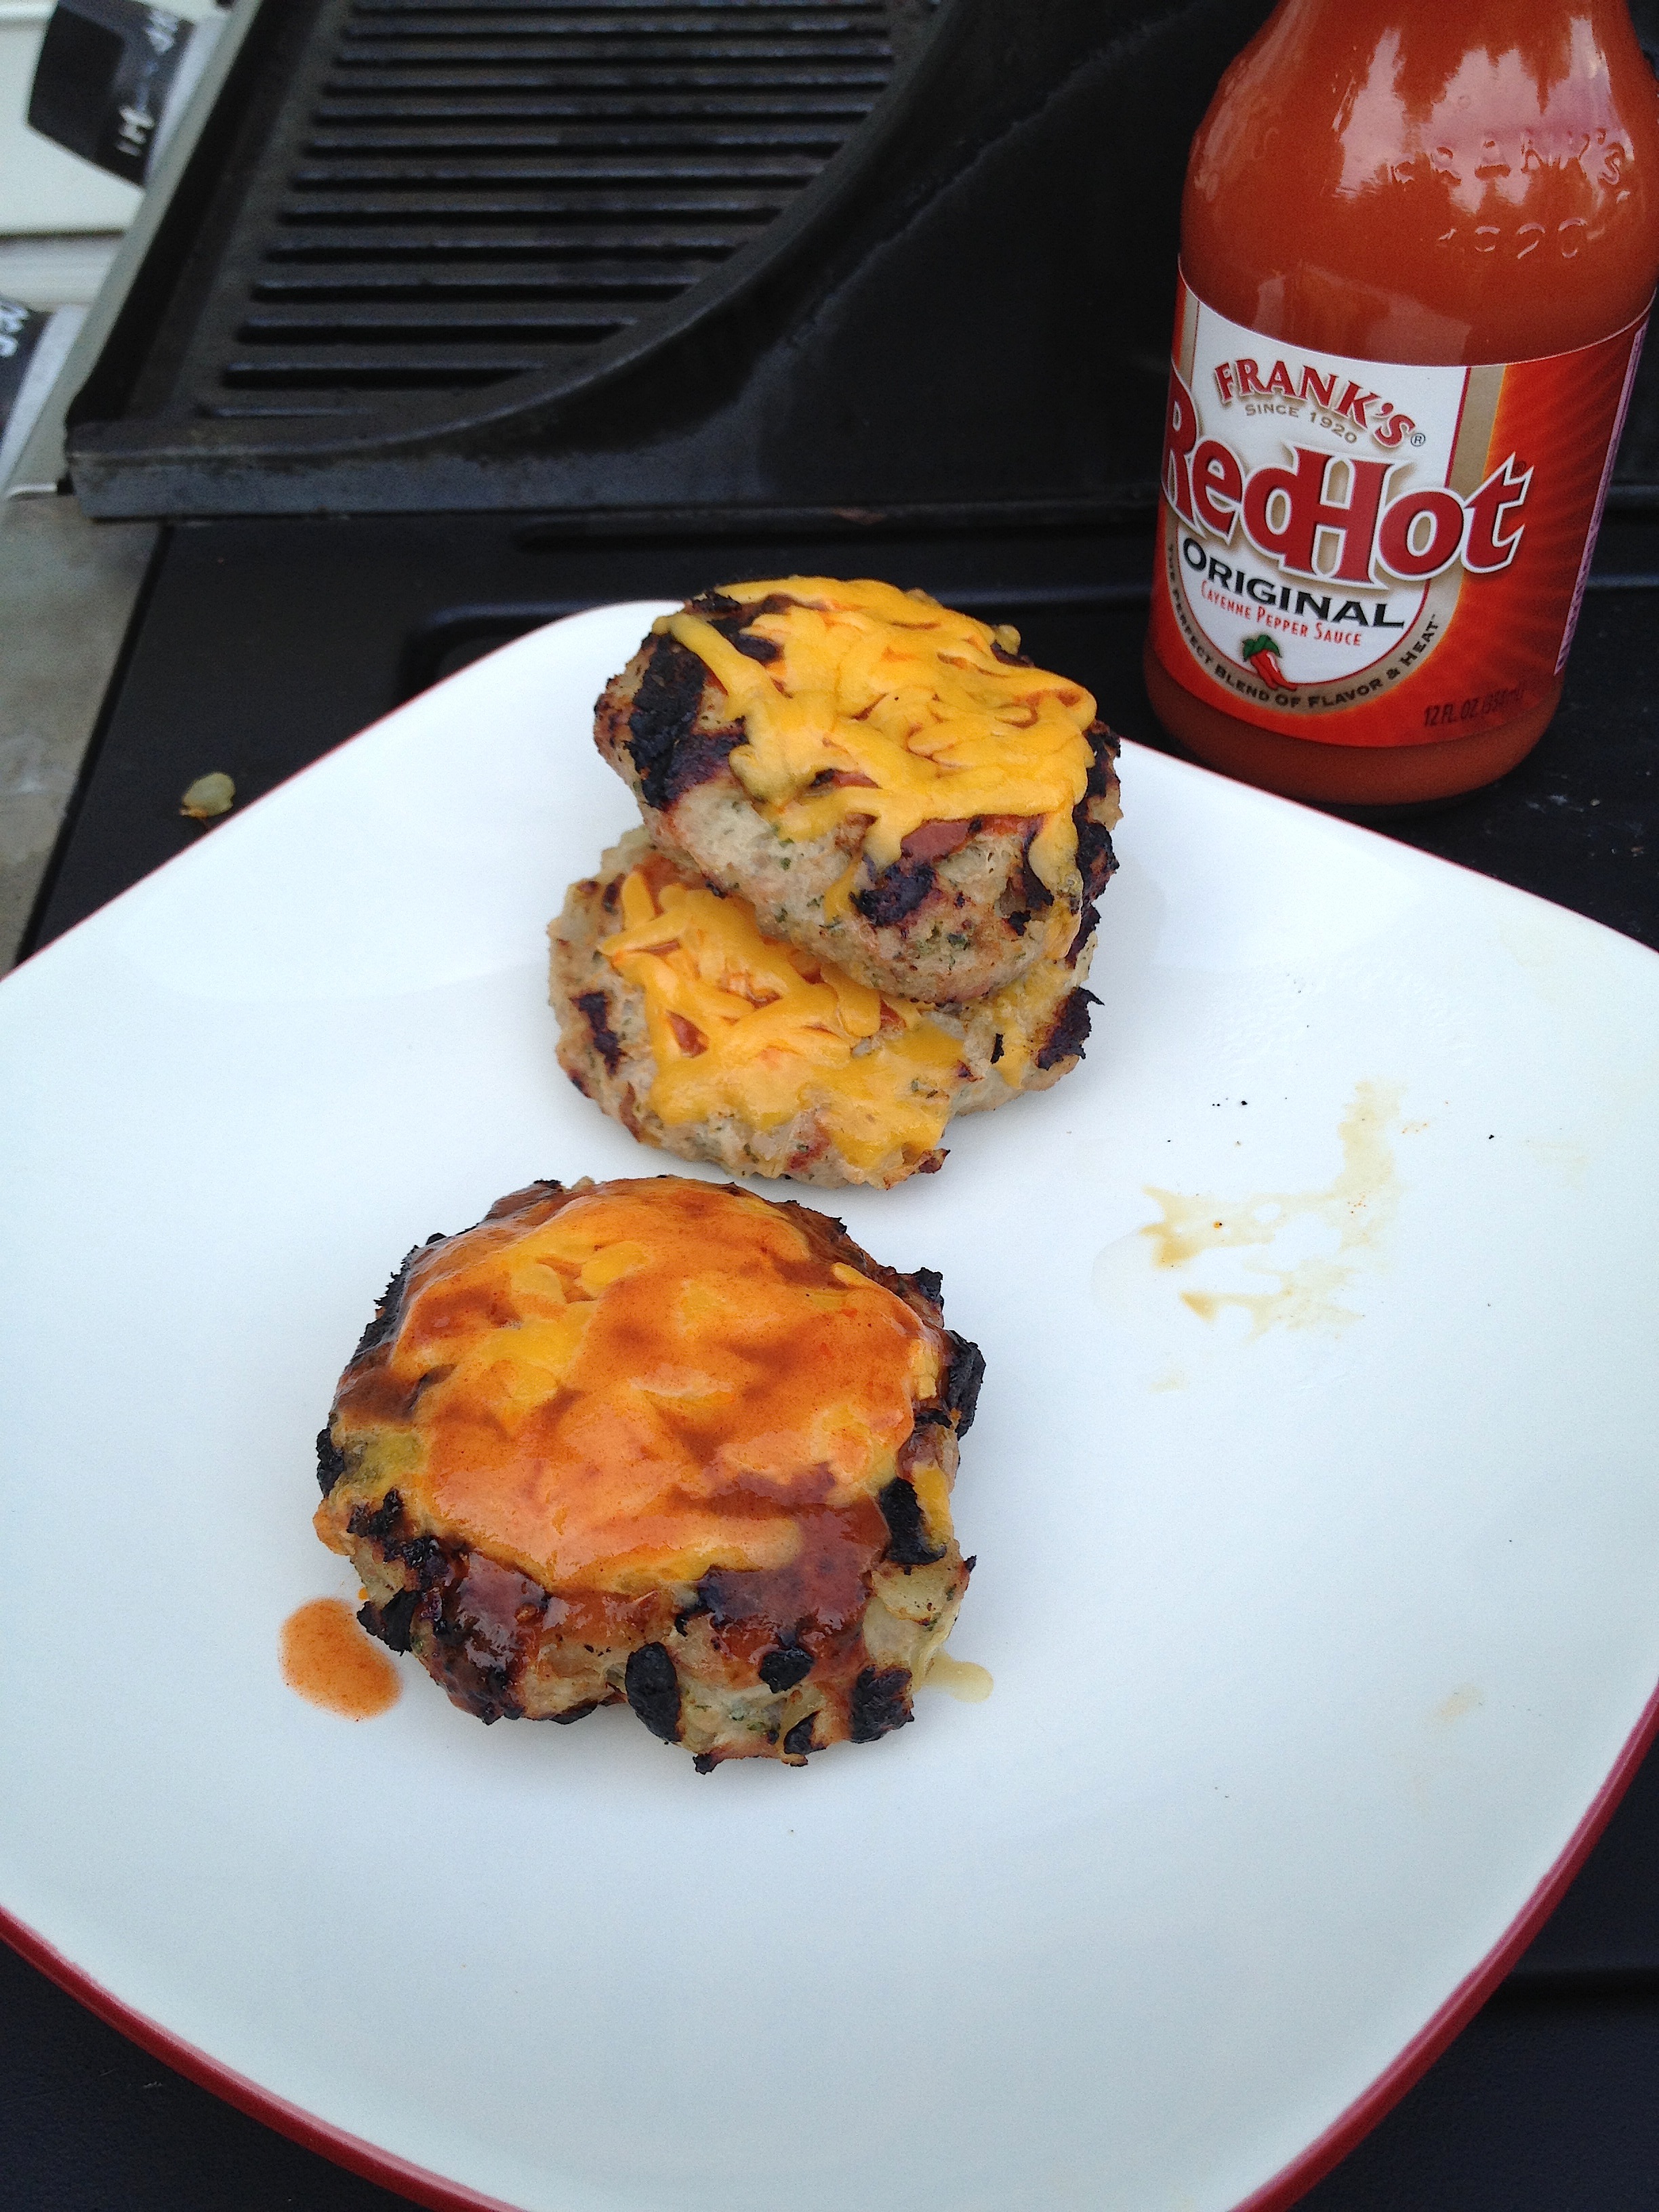
Cheese is optional. I’ve had these burgers with and without cheese, and find them to be delicious and satisfying either way. Sometimes I simply don’t want to mess with trying to perfectly top the burgers with cheese, but there’s also something about melted cheese that takes any hamburger to a new level!

Buffalo-Ranch-Burgers-Tall

Buffalo Ranch Turkey Burgers

Ingredients (makes 4 -6 hamburgers)
  • 1 lb lean ground turkey
  • 1 small/medium onion, roughly chopped
  • 1 Tbs olive oil
  • 2 Tbs dry ranch dressing mix
  • 1 – 2 Tbs milk (water also works)
  • 1/4 c Frank’s Red Hot, divided (feel free use more or less, to taste)
  • 1/4 c shredded cheddar cheese (optional)
  • Hamburger buns (optional)
Directions
  1. Add the olive oil to a small skillet and turn heat to medium. When the oil is warm, add the onion to the skillet and stir to coat with oil (If you happen to have used a large-ish onion and the oil doesn’t seem to be coating everything, just drizzle in a bit more oil). Continue cooking the onion, stirring frequently, until it softens and turns light brown in color. This takes any where from 10 – 20 minutes, depending on how much onion is in the pan, different stovetops, etc. When the onion is cooked, move it to a mixing bowl.
  2. Add the ground turkey, ranch dressing mix, and milk to the mixing bowl and combine all the ingredients together.
  3. Divide the mixture into 4 to 6 even sections, and form each section into a patty (I prefer 6 smaller patties, but make whatever size you’d like).
  4. Put each of the hamburger patties onto a grill, over medium/high, direct heat. Grill for about 12 – 15 minutes.  About halfway through the cooking time flip the burgers and drizzle each with about 2 tsp of the hot sauce (it’s okay to approximate here, you can even just shake it on from the bottle). Continue to let the burgers cook for the remainder of the cooking time, or until the internal temperature of each hamburger reaches 165° F.
  5. If adding cheese, when the burgers have cooked through, sprinkle about 1 Tbs of cheddar cheese onto the top of each patty and leave them on the grill for another minute or two, to let the cheese melt.
  6. To serve, top each hamburger with approximately another 2 tsp of the hot sauce. Place on a hamburger bun if desired. If serving GF and regular hamburgers, be sure to make ALL GF burgers before making any burgers using wheat buns, to avoid cross contamination.
 Serve this with

Sweet Potato Noodles, Grilled Corn, and Green Onions in Brown Butter Sage Sauce

Posted on

This side dish is a bit more indulgent than your usual vegetable side dish. Sweet potato noodles, grilled corn, and grilled green onions provide tons of nutrients in each mouthful. The brown butter sage sauce amps up the flavor!

Sweet-Potato-Noodles-Grilled-Corn-Brown-Butter-Sauce-Close

I found this recipe (Pan Toasted Brown Butter Gnocchi with Grilled Corn + Scallions) on Pinterest a while ago. It’s not a gluten free recipe. In fact, it calls for premade gnocchi which I have NEVER seen a gluten free version of (if you live in a bigger city than me, you may have that available). But I wanted to try the recipe, and figured any gluten free pasta would be an easy substitute for the gnocchi.

Of course, the pasta was delicious (as is everything I have ever tried from How Sweet It Is), but the preparation was hectic. In typical me-style, I made a serving of GF pasta for myself and a serving of regular pasta for Steve, so that was two separate pots of pasta to look after. Then there was the corn and scallions to grill, the butter to brown, and finally putting everything together in a skillet to toast.  It was one of those “every burner on the stove is being used right now” kind of meals. I’m not fond of that.

After making butternut squash noodles with a brown butter sauce a few weeks ago, I remembered this recipe. I realized that using vegetable noodles in place of the gnocchi would take out a lot of the work. Sweet Potato seemed like the natural choice to make the noodles out of.  I whipped up a batch for dinner one night and it was just wonderful.

Sweet-Potato-Noodles-with-Grilled-Corn-Brown-Butter-Sauce-Square

I switched up a few other things, too. I added sage leaves to the brown butter. Cooking the sage in the butter makes it nice and crispy, and adds just another delicious flavor to this side dish. I also left out the parmesan cheese. In making this a few times I noticed that I kept forgetting to add the cheese. I figured it wasn’t that important.

Sweet-Potato-Noodles-Grilled-Corn-Brown-Butter-Sauce-Tall

For what it’s worth, I consider this a moderation food. It’s mostly made out of vegetables, but the butter makes it high in calories. I love the brown butter/sage combination, so whenever I eat something that involves that sauce I am just careful to only eat a serving at a time. That inevitably means there will be leftovers. That means you get to enjoy this more than once! That is, as long as you are the lucky person to get to the leftovers first!

Sweet-Potato-Noodles-Grilled-Corn-Brown-Butter-Sauce-Over-Square

P.S. I made these beautiful sweet potato noodles with a spiralizer, which I looovvvee.  Don’t feel like you need a spiralizer to make this recipe though. A plain, old vegetable peeler will do the trick. You’ll just end up with thin, wide noodles.

Sweet-Potato-Noodles-Grilled-Corn-Brown-Butter-Sauce-Tall-Over

Sweet Potato Noodles, Grilled Corn and Green Onions in Brown Butter Sage Sauce

Ingredients
  • 2 ears of corn, husked
  • 6 green onions
  • 1 large sweet potato, peeled
  • 4 Tbs salted butter
  • 2 Tbs fresh sage leaves
  • 1 Tbs olive oil
Directions
  1. Turn on the grill and let it preheat. When it is hot, lay the corn and green onions onto the grill. Cook the green onions for about a minute, flip, and cook for another minute. Let the corn cook for about 10 minutes, turning it every few minutes until each side has some brown on it.
  2. Slice the grilled green onions, and cut the kernals off of the corn cob.
  3. Add the butter to a small skillet over medium heat.
  4. While the butter is melting, spiralize your sweet potato into noodles (you’ll at least have a few minutes to work on this. If the butter has melted, move onto the next and come back to the sweet potato noodles later).
  5. Immediately, once the butter has melted, start whisking it with a small whisk or fork. When white foam appears in the butter, add the sage leaves. Keep whisking, continuously, until you start to see brown bits forming in the butter (usually on the bottom on the skillet). Remove the skillet from the heat.
  6. If you need to, finish making the sweet potato noodles do that now!
  7. Once the sweet potato noodles are ready, add the olive oil to a large skillet and heat on medium high.
  8. When the oil is warm, add the sweet potato noodles. Stir to coat them in the oil. Cook for about 10 minutes, or until the noodles are soft and tender.
  9. Stir in the brown butter/sage sauce, corn, green onions. If desired, cook for another minute or two until everything is heated through.

Serve this with:

Grilled Margherita Pizza

Posted on

So, pizza. Grilled Pizza.

Gluten-Free-Grilled-Margherita-Pizza-Tall2

As much as I enjoy eating healthy foods there seems to be a soft spot in my heart for pizza. Homemade pizza was a Sunday tradition when I was growing up. There’s still something about eating pizza on a Sunday that just feels so comforting!

To keep things homemade, I spent months and months of Sundays testing out gluten free pizza dough recipes until I found one I was happy with (you can find that recipe here). A bit more testing later, I was able to easily adapt this recipe for grilled pizza.

Gluten-Free-Grilled-Margherita-Pizza-Slice

Many people have heard of grilled pizza before, but if you haven’t tried it you are in for a treat! It is actually much quicker to grill pizza than to bake it in the oven, but your grilled pizza still has all the same elements of a good pizza:  crispy crust, melty cheese, and loads of your favorite toppings. Grilled pizzas tend to be more free form in shape, too. The cooking technique is obviously a bit different for making pizza on the grill versus in the oven. Since the whole cooking process happens so fast on the grill I’ve noticed that less complex pizzas with fewer toppings are easier to manage. With only a couple toppings, a margherita pizza is perfect for grilling, especially if you are new to the process.

Gluten-Free-Grilled-Pizza-Whole

Even though we have been grilling pizzas for a while now, the simple toppings on a margherita pizza always hit the spot. Tomato sauce and cheese are nearly a requirement for any pizza (except white pizzas, but that will have to be another post for another day). The fresh basil steals the show here. I tend to add about 2 tablespoons per pizza, but if your garden is overflowing with basil like ours is than you may want to add even more. For an extra bit of flavor I season the pizza dough with garlic. Tomato, basil, garlic, mozzarella? So many delicious flavors in that short list!

Gluten-Free-Grilled-Margherita-Pizza-Close

As far as actually grilling the pizza, the process is simple. The one and only important key to grilling pizza with this particular dough is to start with chilled dough. I like to shape my dough onto a silpat mat and then stick it in the refrigerator for about 15 minutes. The dough is naturally sticky, but it becomes much, much easier to work with when it is cold. Spray the chilled dough with olive oil spray (or other cooking spray) and lay it on the hot grill.

Pizza-Dough-On-Grill

Cover the grill and let the pizza sit undisturbed for a few minutes. Just a few. Then, check the underside of the dough to see if it is done. You want the dough to be crisp on the bottom, with grill lines, but not burnt (Unless you are one of those people, like my mom, who enjoys somewhat burnt food)! When the bottom is done, just flip the dough over.

Checking-Pizza-Doneness

Now is that part where you will need to work fast. Add the toppings. I like to do tomato sauce, followed by a sprinkling of cheese and then topped with fresh basil. As you can see from these photos, my husband choose to add his toppings in a very unique order.

Adding-Pizza-Toppings

Topping order, your choice. Like I said, the most important thing is to do this quickly. You don’t want to take so long adding your toppings that the bottom of the pizza burns before you’ve finished! Once the toppings are on cover the grill again, just for a moment. When the cheese has melted the pizza is ready to cut and serve!

Gluten-Free-Grilled-Pizza-Square

Gluten Free Grilled Margherita Pizza

This recipes will make one medium sized pizza that will serve two people. You can also split the pizza dough in half to make two personal sized pizzas.
 
Pizza Dough Ingredients
  • 1 tsp sugar
  • 3/4 c hot tap water
  • 1 Tbs dry active yeast
  • 1/2 c white rice flour
  • 1/4 c brown rice flour
  • 1/4 c tapioca starch
  • 1/4 c potato starch
  • 2 tsp xanthan gum
  • 1 tsp gelatin powder
  • 1 tsp olive oil
  • 1 tsp apple cider vinegar
Other Ingredients
  • cooking spray (I use olive oil spray)
  • garlic powder
  • 1/4 c pizza sauce (the generic kind at my grocery store is GF, read the label to be sure yours is, too!)
  • 2/3 c to 3/4 c shredded mozzarella cheese
  • 2 Tbs chopped fresh basil
Directions
  1. Stir the sugar and yeast into the tap water. Let the mixture sit for 5 – 10 to proof. It will get bubbly and expand.
  2. While the yeast is proofing, combine all of the remaining dough ingredients in a medium sized mixing bowl, or the bowl of a stand mixer.
  3. Add in the yeast and mix until the dough forms a ball. If using a stand mixer, use medium speed.
  4. Put the pizza dough on a silpat, mat, piece of parchment paper, or wax paper, and use your hands to shape into a circle, about half an inch thick. If the dough is sticky run your hands under cold water and then go back to shaping it without drying your hands completely. Lay the shaped dough in the refrigerator to chill.
  5. While the dough is chilling, light the grill and let it get to a high heat level. Take some time to bring all of your toppings, and any plates or utensils you will be using out to the grill.
  6. Gently loosen the pizza dough off of the silpat/parchment paper/wax paper. It may be a bit sticky and not come off in exactly the shape you pressed it into, but will be close enough. Spray one side of the pizza dough with the cooking spray, and sprinkle on some garlic salt (I shake it on directly from the bottle). Spray the grilling surface with cooking spray, and lay the oiled side of the pizza onto the just oiled grilled. The un-oiled side should now be facing up on the grill. Give this a quick spray with the cooking spray, and another shake of garlic powder.
  7. Shut the grill lid. Check on the pizza every minute or so by gently lifting up a side to see if the bottom is cooked.
  8. When the bottom of the pizza is crisp and has brown grill lines flip the pizza using a spatula.
  9. Now add the toppings, somewhat quickly. Spread the pizza sauce evenly across the pizza. Sprinkle the shredded mozzarella on top of that, followed the by the fresh basil. Shut the grill lid once you are done.
  10. Again, check the pizza every minute or so. The pizza is done once the cheese has melted and the bottom has dark grill lines.
  11. Cut into slices and serve hot.