RSS Feed

Tag Archives: Eggs

Spiralized Hash Brown, Egg, and Bacon Bake

Posted on

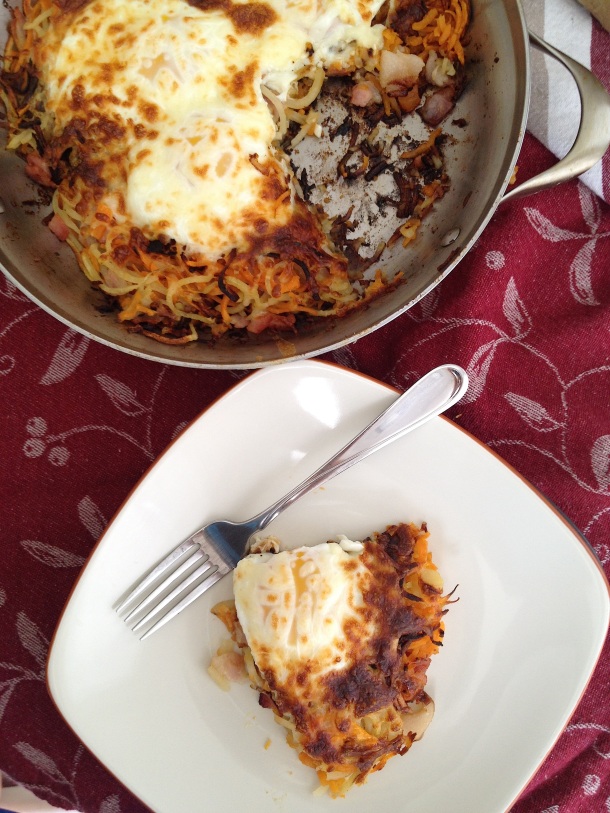
Crispy potatoes and bacon topped with baked eggs and a sprinkle of mozzarella cheese. A hearty breakfast, brunch, or breakfast for dinner casserole!

Spiralized-Potato-Bacon-Egg-Bake-Slice

I really wanted to get this post up a week ago, but time was just not working in my favor. Seeing 600+ children a week with coughs and runny noses had me fighting off a cold. I had activities scheduled for every evening, and even had work events on the weekend. I tried to sit down and blog on Wednesday evening and nearly fell asleep at the computer! I really don’t want to give up writing this blog, so I’m going to try to stick with a short and sweet post this week. I’m sorry I missed out on getting this up last week!

Strangely enough, the last recipe I posted was also for a breakfast. You’d think that with getting up at 6am most days, then being at work by 7am, I would not be making many complex breakfasts. Somehow, that seems to be where most of my food creativity has been lately! Once it’s the weekend I just want a breakfast that isn’t as boring as the same old weekday stuff.

This “hash brown”, egg, and bacon skillet is definitely more of a weekend breakfast/brunch item. Maybe even breakfast for dinner type of food. It’s hearty and filling!

Spiralized-Potato-Egg-Bacon-Bake-Square

This recipe started with me really enjoying using my spiralizer. I use it all the time for dinners, but less often for other meals. Sure, I could just use (and have used) a grater to make hash browns, but spiralized potatoes seem more exciting! I like this breakfast with a combination of white and sweet potatoes to keep the flavor interesting and include more nutrients than usual white potato hash browns.

Spiralized-Potato-Bacon-Egg-Bake-Tall

Add some diced bacon, eggs, and a handful of cheese to the cooked potatoes and you have an all-in-one meal. Just pop in the oven on broil for a few minutes to cook the eggs! Believe it or not this breakfast/brunch doesn’t take forever to make. It’s not quite quick enough for a rushed morning, but can easily be cooked from start to finish in under 30 minutes! Totally worth it for special weekend morning!

Spiralized-Potato-Egg-Bacon-Bake-Over

Spiralized Hash Brown, Egg, and Bacon Bake

This serves 2 – 4, but is easily variable. Choose larger potatoes or crack a few extra eggs on top to increase the number of servings.
 
Ingredients
  • 1 small white potato
  • 1 small sweet potato
  • 4 slices of bacon (regular or turkey bacon both work)
  • 4 eggs
  • 1/4 c mozzarella cheese
  • cooking spray
Directions
  1. Spiralize both potatoes using the medium sized blade. Alternatively, you can use a julienne peeler or mandoline to cut the potatoes into thin strips.
  2. Generously spray an oven-safe skillet with cooking spray. Add the spiralized potatoes to the skillet, mix a bit to even out the two varieties if need, and then turn the burner on to medium heat. Let the potatoes cook for about 10 minutes on the first side. Use a spatula to peek at the bottom of the potatoes every once and a while to see if they are browned.
  3. While the potatoes are cooking, dice the bacon and sprinkle it over the cooking potatoes.
  4. After about 10 minutes, or once the bottom of the potatoes are browned flip them. The potatoes will have cooked together pretty well, but may still separate. Just do your best, and flip in a few smaller sections in you need to.
  5. Let the potatoes cook on the second side for another 10 minutes or so, until the bottom is just starting to brown. When you notice the bottom is getting crisp and light brown crack the eggs on top. Sprinkle the mozzarella cheese on top of the eggs.
  6. Put the whole skillet in the oven, on broil, for about 5 minutes, for soft yolks, or a few minutes longer if you want fully cooked yolks. I test egg-doneness by shaking the skillet a bit. You’ll be able to see how firm the eggs are by how much they move.
  7. Remove from the oven and cut into wedges to serve.


Sweet Potato & Egg Breakfast Skillet

Posted on

Three ingredient, make ahead breakfast with eggs and sweet potatoes. It’s simple, but not lacking in flavor. A great healthy start to the day!

Sweet-Potato-Egg-Breakfast-Skillet-Front

A few months ago I spotted this Sweet Potato Hash recipe on the Kitchn (one of my absolute favorite cooking blogs). Honestly, it didn’t look super appetizing to me, but it sounded like something I’d be happy to get up and eat in the morning. Breakfasts here were a little rough around the edges at that time. It was always a “what do you want to eat today” type of deal. Which seems pointless, looking back, because there were really only two things we were eating for breakfast; oatmeal and cereal. So, I got the ingredients for this new recipe, followed the directions to a tee, and it was just as delicious as I’d imagined it to be.

Comparing my version below, and the original recipe you can see a lot of changes have been made. Mostly, things have been simplified and “southern-ified” (avoiding turning on the oven as much as possible when the temperature is so high). Would I still make the full recipe for a brunch of special occasion? Absolutely! Do I like my version better for weekday breakfast? Yup!

Sweet-Potato-Egg-Breakfast-Skillet-Square

I always prepare the sweet potatoes ahead of time. I dice them, cook them, and then store in the refrigerator until I’m ready to use them for a breakfast (just use them sometime within a week!). The morning I want to make this breakfast skillet I pull out the already-cooked sweet potatoes and eggs and layer them in my Calphalon skillet. Bake for about 15 minutes and breakfast is ready!

Sweet-Potato-Egg-Breakfast-Skillet-Containers

Have I mentioned before how much I love this calphalon pan? It’s oven safe, which makes it my go-to pan for this recipe. It’s also safe for use with metal utensils, which is a biggie for me. I hate having to use only certain things with certain pans. I’ve found that even though it’s not coated with teflon it’s still surprisingly nonstick-like. Just a spray of cooking oil and none of these eggs or sweet potatoes stick to the pan ONE BIT! And eggs are sticky – this is saying a lot! These pans are elegant looking, and clean up so quickly and easily (check out the pictures, that skillet looks brand new), so you can keep them in great condition. I’m all about buying quality products that last, not getting something cheap and then needing to replace it just months later. Plus, I’m a lot more likely to make a fancy breakfast like this if I know the clean up will only take 30 seconds!

Sweet-Potato-Egg-Breakfast-Skillet-Over

Anyway, back to the food.

The directions below will get you two separate breakfasts (If you’re making food ahead of time, why not make extra? More food, same effort!), but you can very easily make more or less, or even vary the egg to sweet potato ratio. I always cook this with over-medium eggs. If you prefer solid yolks, cook them a bit longer. Softer yolks, a bit less. Personally, I find a runny egg yolk over my sweet potatoes + a dash of salt to be one of the most perfect, savory breakfasts out there!

Sweet-Potato-Egg-Breakfast Skillet-Tall

Sweet Potato & Egg Breakfast Skillet

This recipe is written to make enough sweet potatoes for two breakfasts. I bake 4 eggs with each batch of sweet potatoes, which feeds two people. To serve more people, try adding extra eggs, or just baking all the sweet potatoes and eggs at once.
 
Ingredients
  • 2 lb sweet potatoes, peeled and diced
  • 2 Tbs olive oil
  • 8 eggs (4 eggs each, for 2 total breakfast skillets)
Directions
  1. Add the diced sweet potatoes and olive oil to a large non-stick skillet.  Cook for about 15 minutes, stirring occasionally, until the sweet potatoes are tender (I test using a fork – if the fork easily goes in, the potatoes are ready). Let the cooked potatoes cool before putting them in an airtight container. Store in the refrigerator for up to a week before using.
  2. The morning you want to serve, preheat the oven to 425° F.
  3. Spray an oven-safe skillet with cooking spray (I use misto). Add a layer of potatoes (about half of the total made in step 1). Crack 4 eggs on top, and sprinkle with salt and pepper.
  4. Bake for about 15 minutes. Check frequently near the end to see if the eggs are cooked. Serve hot.
  5. Save the remaining sweet potatoes and eggs to make another morning.

Mint Chocolate Chip Meringues

Posted on

These irresistible mint chocolate chip cookies are light and fluffy. Their green color is perfect for Christmas, too!

IMG_8427

My Mom, sister, and I used to make these cookies every Christmas season. We would whip them up late one night, just before bed, since they sit in the oven overnight to bake. I was always so excited to wake up in the morning and try one of the freshly baked cookies! We made these meringues at other times of the year, too, and changed the color to match the holiday.

IMG_8405

After years of making these cookies – and as a child, at that – I was very frustrated when my first four (yes, four) attempts at making these cookies as an adult failed. Not only did I waste ingredients (I hate waste!) but I knew that I could make these cookies and that the recipe worked. All of our modifications were written right on the original copy of that recipe in my own 8 year old handwriting! Well, four attempts and no cookies later I gave up, figuring my failure was probably due to the humidity.

Fast forward a few weeks. I made a huge pot of Avgolemono Soup and had 5 leftover egg whites. Rather than waste the egg white I decided to give the meringues one more try. I took every humidity precaution possible and when I saw the meringue form perfectly I knew the cookies would be a success! I happily ate one for breakfast the next morning.

IMG_8411

Here are some tricks I learned about successfully making a meringue:

  1. Use room temperature egg whites. I let the egg whites sit out on the kitchen counter for about 12 hours before using them, which was more than enough time for them to get to room temperature.
  2. Chill the mixing bowl and beaters. Put the mixing bowl and beaters in the refrigerator at least half an hour before you start baking.
  3. Use a low speed and be patient! Don’t try to rush the meringue by jacking up the beater speed too high or by dumping in a bunch of sugar at once. Just go slowly.
  4. When beating the egg whites you want stiff peaks to form. Egg whites will first get foamy, and then softer peaks will form. You will know you have achieved stiff peaks when the meringue stands up straight when the beaters are lifter out of the bowl (only test this when the beaters are turned off). If the tips of the meringue fall to the side you are still at the softer peaks – be patient and keep beating until you see stiff peaks!

8448 crop

When you are familiar with what meringue looks like making these cookies is a breeze! These are great to bake with kids or a friend – anyone you can share the beating with (you arm will get tired if you do it on your own). The overnight baking is a fun feature of these cookies, too. You’ll love waking up in the morning to freshly baked mint cookies!

IMG_8455

Mint Chocolate Chip Meringues

Ingredients:
  • 1/4 tsp cream of tartar
  • 3 egg whites
  • 1 cup granulated sugar
  • 1/4 tsp mint extract
  • 8 drops green food coloring
  • 1 c mini chocolate chips
Directions:
  1. Preheat the oven to 350° F.
  2. In a large bowl, beat the eggs and cream of tartar at a medium low speed until stiff peaks form.
  3. Still beating at the same speed, add the sugar slowly mixing in just 1 tablespoon at a time.
  4. When all the sugar has been added, beat in the mint extract and green food coloring.
  5. Fold in the chocolate chips.
  6. Line two baking sheets with wax paper. Drop tablespoons of the meringue onto the baking sheets, about and inch or two apart.
  7. Turn the oven off, and place the cookie sheets in the oven. Leave the cookies in the oven overnight.
  8. Store cookies in a dry place.

Bangers & Mash Casserole

Posted on

This is a healthy casserole. It sounds like it should be unhealthy, it tastes like it should be unhealthy, but it is actually good for you.

Bangers and Mash is a delicious British dish made of sausage and mashed potatoes. Whenever I’ve seen it at restaurants its been very simple; a few sausages on top of a bed of mashed potatoes. There may be some gravy poured over it or a side of veggies, but nothing much different from that.  Bangers and Mash is actually a pretty good meal option for someone on a gluten free diet because most mashed potatoes and sausage are naturally gluten free. I’ve even been surprised at the number of restaurants that make all of their gravies with cornstarch, making that naturally gluten free, too.

IMG_7997

Sausage and mashed potatoes are not exactly the healthiest foods in the world so I made a few swaps to get this casserole up to a more healthy level. For the sausage, I used all natural chicken sausage. Both Al Fresco and Aidells have a full line of flavors in their natural chicken sausages. I’ve tried a few flavor varieties and the best results have been with a cajun flavored sausage. The spicy sausage against the smooth and creamy mash is a great combination. Of course, with all of the sausage flavor options out there I am sure that there are some other great combinations. I just happen to be a fan of spicy foods.

To healthify the mash part of the casserole I swapped the potatoes for cauliflower. Cauliflower is much healthier than potatoes and mashes up to be just as smooth and creamy in texture. There’s a bit of a taste difference between the two, but with all of the other flavors going on in this casserole any flavor from the cauliflower is overpowered.

If the cauliflower wasn’t healthy enough for you, there’s also a quiche layer on the very bottom of the casserole filled with eggs, spinach, and onions. Sure, there’s a little mozzarella cheese in there, too, but what would a casserole be without just a little cheese?!

Surprisingly, with three layers, this casserole won’t take all day to prepare. While the cauliflower is boiling you’ll whip up the quiche layer and brown the sauages. Once those are laid out in the casserole pan you drain and mash the cauliflower, spread it on top, and pop the whole dish in the oven.

Bangers and Mash Casserole

Ingredients
  • 1 head cauliflower
  • 2 Tbs plain greek yogurt
  • 1/2 tsp salt
  • 4 fully cooked, cajun flavored chicken sausage
  • 5 eggs
  • 3/4 tsp baking powder
  • 3/4 tsp salt
  • 3 Tbs all purpose GF flour
  • 2 c chopped spinach
  • 3/4 c shredded mozzarella
  • 1/3 c green onions, sliced
Directions
  1. Preheat oven to 375° F.
  2. Cut the cauliflower into florets and place in the large pot of water. Bring to a boil, and let simmer for about 20 minutes, or until very soft.
  3. While the cauliflower is cooking whisk the eggs together. When the eggs are combined whisk in the baking powder, salt (3/4 tsp), and flour. Stir in the spinach, mozzarella and green onions.
  4. Spray a 2 qt. baking dish with cooking spray and pour the eggs mixture on the bottom.
  5. Cut each of the sausages in half length-wise. If desired, cook the sausages for a few minutes on each side over medium-high heat, until they are lightly browned on each side (Since sausage is already fully cooked, this step isn’t necessary).
  6. Place the sausage in a row on top of the egg mixture. They may sink down into the eggs – this is okay.
  7. When the cauliflower is soft drain it and then return it to the pan. Using an immersion blender or beaters, whip the cauliflower until it is very smooth. Add the greek yogurt and salt and whip again until the yogurt is totally mixed in. Spread the cauliflower on top of the sausages.
  8. Bake for 25 minutes, or until the bottom quiche layer is cooked through.

Egg & Sausage Breakfast Crepes

Posted on

Since I’ve posted two recipes for making crepes on this blog it’s about time for today’s post, which is a recipe for a crepe filling!

These breakfast crepes are loaded with scrambled eggs, chicken sausage, and cheddar cheese. It’s just like those breakfast sandwiches that are usually served on a bagel or English muffin, but instead it’s all wrapped up inside a warm gluten free crepe.

When I make breakfast crepes I almost always make the actual crepes ahead of time (It’s actually quite convenient to have a few crepes in the refrigerator ready to turn into a quick breakfast or lunch). If you have your crepes already made you can make this breakfast in just a few minutes more than it takes to make scrambled eggs! I scramble up some eggs, get my premade crepes and fully cooked chicken sausage out of the fridge, and then just heat each crepe individually in the frying pan. Add some cheddar cheese, which melts to hold everything together, and the crepe is done!

By the way, the filling for this crepe is totally customizable. I like to use a spicy cajun sausage, but a mild breakfast sausage or some leftover bacon would also be delicious. The cheddar cheese could easily be substituted with anything that melts easily; mozzarella or colby jack would both be wonderful. Also, the options for adding veggies are endless: onions, spinach, bell peppers, green onions, just to name a few!

Egg & Sausage Breakfast Crepes

 
Ingredients
Directions
  1. Cut the sausage and any vegetables you are using into bite sized pieces.
  2. In a nonstick skillet, scramble the eggs over medium heat.
  3. Empty the cooked eggs out of the skillet and lay a crepe down flat in the same skillet. If the skillet is mess from the eggs, you can use a clean one, too. You’ll want to turn the heat down just a hair. The skillet should be warm enough to heat up the crepe and filling, but not so hot that it burns the outside of the crepe. With my stove, this falls right under medium.
  4. When the crepe has heated up, add the toppings in a line down the center, ending with the cheese. Fold each side over the center.
  5. Allow the crepe to cook until the cheese is soft and melting.
  6. Repeated this process with the remaining five crepes.

Magic Dragon Noodles

Posted on

IMG_4426 copy

I saw these Dragon Noodles on Budget Bytes and so wanted to eat them. Quick and spicy noodles? I’m in! Chances are that if you are reading this blog you know that GF noodles just don’t always cut it. Sometimes you can sub them into a recipe and no one is the wiser (like casseroles), but other times the results are undesirable. Mushy, overcooked noodles that are all stuck together – anyone else have that happen to them?

IMG_4413 copyEnter Miracle Noodle! Have you heard of these? They are GF, don’t need to be cooked like regular noodles, and have zero calories. These aren’t a great substitute for noodles all around, but they are awesome for stir-fry like dishes. The noodles will heat up right in the frying pan along with any sauce, meat, and veggies you want to add.

That’s part of why I call these noodles “magic”. You literally just open up the package and heat them up on the stove or in the microwave. Then there’s the whole calorie-less noodles thing. It’s easy to rationalize the butter and eggs that go into the sauce when you know you have saved so many calories! Finally, this is just so quick and easy to prepare! When you get a tasty, low calorie meal in under 10 minutes I would say that is pretty darn magical!

IMG_4436 copyThe sauce on these noodles is super spicy! If you enjoy hot and spicy foods then you will love this. If you’re not so keen on that then cut down on the sriracha and you’ll enjoy this much more.

IMG_4417 copy


Magic Dragon Noodles

 
Recipe Inspiration: Dragon Noodles on Budget Bytes
 
Ingredients
  • 1 package of Miracle Noodles
  • 1 Tbs butter
  • 1 egg
  • 1 Tbs brown sugar
  • 1 Tbs soy sauce (or Bragg’s Amino Acid)
  • 1 Tbs sriracha
  • 3 Tbs chopped green onions
Cooking Directions
  1. In a small bowl combine brown sugar, soy sauce, and sriracha.
  2. Melt butter in a medium sized skillet over medium heat.
  3. When butter is melted add the egg and scramble.
  4. Once the egg is cooked add the noodles and sauce to the skillet and stir to combine.
  5. Top with green onions before serving.

PGF: Toad in a Hole

Posted on

Toad in a Hole is a recipe from my childhood. It reminds me of of sleepovers at my grandparents house. My parents, sister, and I would go to their house on Fridays, and usually have tuna fish sandwiches for dinner and ice cream for dessert. Sometimes, my sister and I would get to spend the night there. This was a very exciting thing. We’d play card games with Grandma and Grandpa all evening, sometimes make a play in the basement, and then fight over who got to sleep in which bed. One bed frame was higher off the ground than the other, and somehow that made it soooooo much better. We’d fall asleep to the sounds of our grandparents watching a baseball game on TV with the volume very loud, and wake up to the sounds of them preparing breakfast.

In the morning we always had to brush our teeth before breakfast. This was not something we did at home. After teeth brushing we went to the kitchen table where Grandma would already be underway in making some special breakfast, and Grandpa would have orange juice poured ready for us to drink. I remember it so vividly because the orange juice always tasted so disgusting just after brushing your teeth.

One of our breakfast favorites was pancakes. Grandma would whip up some batter and serve us pancakes in any shape we requested. It was often a “K” or an “L”, for our names, or sometimes a plateful of tiny pancake dots. It got more and more complicated, and eventually we were requesting elephant and butterfly pancakes. Grandpa would cart plates of the different shaped pancakes from the stove over to the table where my sister and I were eagerly awaiting them. There was always syrup at the table, and I only even dunked the edge of a pancake in syrup, which is apparently not normal.

Other times, we had toad in a hole for breakfast. Toad in a hole is, I believe, a creation from WWII that combines your egg and toast. You cut a hole in the center of the toast and cook an over easy egg in that hole.

Toad (egg) in a (bread) hole. Creative, huh?

Although there are some advanced bread/egg flipping skills required to make this, the process is pretty simple, even to make GF and non-GF at the same time.

First, I always get out two plates, two skillets, and two spatulas! One set for the GF version and one set for the wheat toast version.

The GF set up is on the left, and the wheat bread set up is on the right. Everything is separate!

Next, you’ll cut a hole in the middle of the slices of bread. You can do it freehand with a knife, use a round cookie cutter if you have one, or even use a glass jar as the cookie cutter.

GF Bread and “holes”, cut and buttered.

After you’ve buttered the wheat bread, cut a pad of butter with the knife and put it on a plate. Butter the wheat bread from that pad, to keep the stick/tub of butter free of crumbs.

To cook, you put the bread in a heated pan and crack an egg right into the hole. It’s kind of fun.

Once the egg has solidified (it will be white and solid on the bottom, but not on the top) it’s time to flip the bread. Now, this can be tricky to do and keep the egg intact. I remember many Saturday mornings when Grandpa would shout over to us “Uh, oh! Grandma just broke a yolk!” I loosen the bread on each side before trying to lift it up and flip it. Still, sometimes yolks will break.

A GF Toad in a Hole, just after being flipped.

Once the egg has cooked through the toad in a hole is done. I like to cook the little bread circles right in the skillet, too, although a toaster will work. Best way to eat these (in my opinon): break the yolk and use the toast circles to scoop it up.

If you want to get really creative, like my Grandmother, you can use cookie cutters to make special shaped holes. We always asked for elephants (we had a special joke with my grandparents about an elephant hiding behind a butterfly. I can’t even explain it.)

My grandparents both passed away last fall, but this breakfast is not gone with them. I still enjoy it on a Saturday or Sunday morning and I think of them every time I make it. I plan to someday make it for my own children and grandchildren and keep the breakfast tradition alive. Sometimes just a simple breakfast can make some great memories!

Toad in a Hole

Ingredients

  • sandwich bread
  • eggs
  • butter, room temperature
Cooking Directions
  1. Cut a hole in the center of your sandwich bread, freehand, or using a cookie cutter. Lightly spread butter on both sides of the bread, and the circle you cut out of the bread. If preparing GF and non-GF, cut and butter all GF bread slices first, then prepare all wheat bread, then wash your hands.
  2. Heat two skillets over medium heat (or one skillet, if you are only using one type of bread).
  3. When pan is warm, place a slice of bread in the pan along with it’s cut out center. Crack and egg into the hole in the slice of bread. Use one skillet for all GF bread, and another for all wheat bread.
  4. When the egg has solidified on the bottom, use a spatula to flip the bread/egg over. If the egg is sticking a lot, it’s probably too soon to flip it. Flip over the small toast circle, also. Try not to break the egg yolk when you flip it!
  5. Cook for another couple of minutes, until the egg is cooked through and the bread is golden brown on the bottom.
  6. Repeat with any remaining bread slices.

Buffalo Chicken Egg Muffins

Posted on

Image

I love egg muffins.

They are fairly quick and easy to make. They taste great fresh but are just as good as leftovers- hot or cold!

I also love spicy foods. The amount of buffalo sauce in this recipe is not going to set your mouth on fire (or get it even close to that), so don’t worry if you are not a spicy food lover! If you want to ramp up the spice level try coating the shredded chicken in buffalo sauce. You could also add more buffalo sauce to you egg mixture. I’d suggest decreasing the milk if you do that, though. The ratio of milk/buffalo sauce to egg keep these muffins very moist, but still able to hold their shape.

If you have them, I’d suggest using silicone muffin cups. Eggs can be so sticky, but the muffins will slide right out of the silicone. Once, I tried making eggs muffins in an old muffin tin (from before the days of nonstick bakeware) that was just sprayed with an olive oil cooking spray. It was a disaster. Lots of soaking and scrubbing, lots and lots. So, use these awesome little silicone liners if you have then, or a nonstick muffin tin.

If you’re a buffalo chicken fan, or just want an easy, on-the-go meal give these a try!

Image

Buffalo Chicken Egg Muffins

Ingredients (makes 12 muffins)
  • 8 eggs
  • 1/4c milk
  • 1/4c buffalo sauce (I used Frank’s Red Hot, but there are many varieties out there to try)
  • 1/2 tsp baking soda
  • 3/4c shredded chicken
  • 1/2c shredded mozzarella cheese
  • a few green onions, sliced
Cooking Directions

1. Preheat the oven to 375° F.

2. Whisk the eggs in a medium bowl.

3. Add milk, buffalo sauce, and baking soda.

4. Pour the egg mixture into muffin cups, filling each one about 3/4 of the way.

5. Drop shredded chicken, green onions, and cheese into each cup.

6. Bake for about 25 minutes. The tops of the egg muffins will start to brown just a bit and will feel spongey. Let cool for a few minutes before removing them from the muffin cups to eat.