RSS Feed

Tag Archives: Spicy

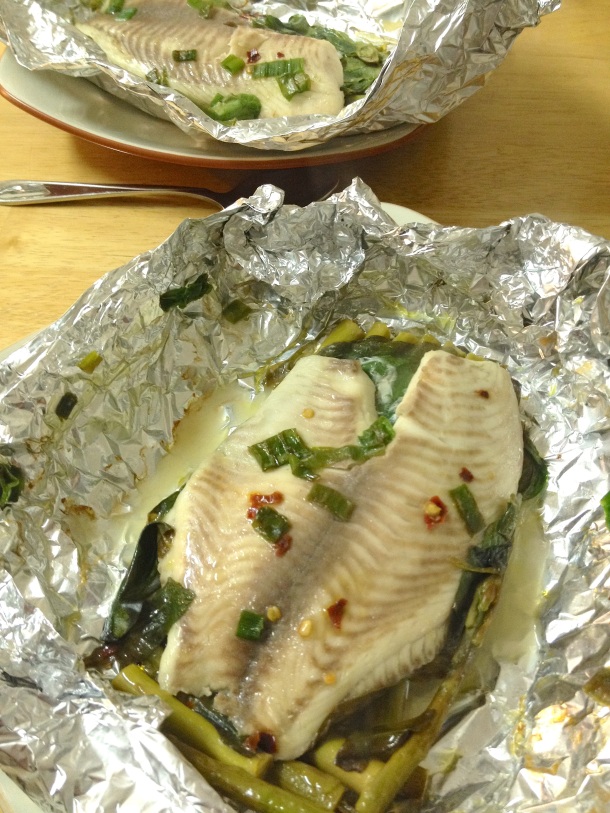
Spicy Lime Foil Packet Tilapia

Posted on

This recipe is the fourth in my month-long series of healthy, weeknight recipes from all around the web. This is stuff I make time and again, usually with some modifications, and still love! Check back (or follow this blog) to see all of the recipes I’ll be featuring this month!

There are so many reasons why this recipe is one of my healthy weeknight favorites. I gotta say, the absolute best part of this recipe is that you won’t dirty any pots of pans making it! Fish + veggies cooked in individual foil packets that are baked right on the rack in the oven. I only use four items total to make this: a knife, cutting board, small prep bowl, and a spoon. Just rinse and throw in the dishwasher. Talk about easy clean up!

Spicy-Lime-Tilapia-Foil-Packet-Dinners

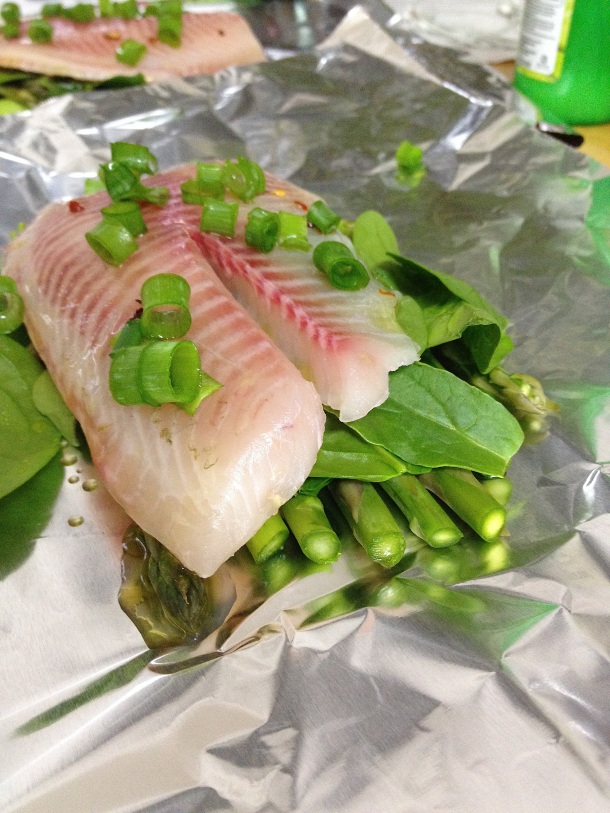
Let’s talk about the food, too, instead of just the prep and clean up. These foil packets are loaded with moist, flakey fish and tons of green veggies. A bit of chili-infused oil and lime juice is spooned over the fish to flavor it. The packets are really easy to put together too. You just stack the asparagus and spinach, top with fish and a few ingredients for flavoring, and then fold up. Serve with a whole grain (see links to a few ideas below) for a a complete, 100% healthy meal that’s ready in under 30 minutes!

Foil-Packet-Spicy-Lime-Salmon-Healthy-Gluten-Free-Dinner

Spicy Lime Foil Packet Tilapia

Many of the ingredients here can be approximated. This is not one of those recipes where everything needs to be measured out perfectly for it to work. If you have a bit less asparagus, prefer more red pepper flakes, etc, the recipe will turn out fine!

Original Recipe Source: Women’s Health

Ingredients

  • 1 1/2 T olive oil
  • 3/4 t red pepper flakes
  • 2 c  spinach (approximately), divided (1/2 c per packet)
  • 20 asparagus spears (approximately)
  • 4 tilapia fillets
  • 5 green onions, sliced
  • 8 t lime juice, divided (2 tsp per packet)

Directions

  1. Preheat the oven to 450° F.
  2. Tear off 4 large sections of aluminum foil (I use foil sections that are about twice as long as they are wide. Better to tear off a bit extra foil than to end up with too little).
  3. Cut the asparagus into 2 inch pieces and lay an equal amount in a rectangle in each of the 4 packets.
  4. Top with the spinach, and then a tilapia fillet.
  5. In a small bowl, combine the olive oil and red pepper flakes. Microwave for 30 seconds (this infuses the oil). Spoon 1/4 of the oil over each tilapia filet.
  6. Drizzle 2 t of lime juice over each packet.
  7. Sprinkle with green onions.
  8. Roll up the edges of each packet and press securely.
  9. Bake for about 15 minutes, or until the tilapia is white and flaky.

Serve this with:
Buffalo Chicken Spaghetti Squash

A creamy, health-ified buffalo chicken mixture served on top of roasted spaghetti squash. A great, nutritious way to enjoy buffalo chicken for dinner!

Buffalo-Chicken-Spaghetti-Squash-Front

For the past ten minutes I’ve been killing time on the internet, trying to figure out how to adequately express that this is just the best meal ever. I mean, I’m a food blogger, ideally everything I post should be perfect and delicious. Will anyone really believe me if I say this is the best food you’ll ever eat?

Buffalo-Chicken-Spaghetti-Squash-Square

And then I thought I could convince you by telling you how often we eat Buffalo Chicken Spaghetti Squash (like, once a week) and how much time I spent trying to take photographs that would show just how mouthwatering it is (3 photoshoots).

I remembered that part of what is so great about this dinner (heck, I’d eat it for breakfast) is that it is healthy, guilt free, and made with good-for-you ingredients. Maybe that is the biggest selling point?!

Buffalo-Chicken-Spaghetti-Squash-Close

As with any food though, flavor matters! Made with the best hot sauce ever, Frank’s Red Hot (or use whatever your favorite is, no hard feelings!) this is as spicy as any buffalo chicken flavored item out there, with a kick of ranch flavor. The creamy buffalo sauce will cover the chicken and spaghetti squash so each mouthful is full of buffalo taste. If you’ve been reading this blog much you know I’m not a huge fan of leftovers and repeat meals, but I ALWAYS want these leftovers the next day!

I hope by now you’re convinced that this may in fact be the best meal ever. Please, try it for yourself, and let me know!

Buffalo-Chicken-Spaghetti-Squash-Tall

Buffalo Chicken Spaghetti Squash

Ingredients
  • 2 boneless, skinless chicken breasts, or 5 chicken tenderloins (this amount does not need to be exact. Also, feel free to skip step 3 and add any cooked cubed or shredded chicken you have on hand)
  • 1 c plain greek yogurt
  • 1/2 c Frank’s Red Hot Sauce (if using a wing sauce, increase to 2/3 c), or more/less to taste
  • 2 T dry ranch seasoning (use a homemade version or make sure the variety you choose is GF)
  • 1 c shredded cheddar cheese (and, honestly, this is delicious without cheese)
  • 2 small spaghetti squashes
  • sliced green onions, for garnish
Directions
  1. Preheat the oven to 400° F.
  2. While the oven is preheating cut the spaghetti squashes in half. I use a long serrated knife, start in the middle, and take my time working my way around the squash. Scoop the seeds out of the squash and discard. Place the squash halves cut side down on a baking sheet (I always put mine of a silpat mat) and bake for 30 – 50 minutes. Different size squashes need different cooking times. I always start checking mine for done-ness at the 30 min mark.
  3. While the squash is cooking, trim any fat off of the chicken. Place it in a saucepan with water and bring to a boil. Reduce heat to medium high and keep a low boil until the chicken is cooked through, about 10 – 15 minutes depending on the thickness of your chicken pieces. Remove the cooked chicken from the pan and let cool on a plate. Once it has cooled a bit, use two forks to shred it.
  4. Add the greek yogurt and hot sauce to a small sauce pan. Heat over medium heat. When the greek yogurt has “melted” add the ranch seasoning and stir to combine. Stir in the shredded chicken  and remove from the heat.
  5. When the spaghetti squash is cooked use a fork to scrap the “spaghetti” strands off the walls of the squash. Top each squash half (filled with the spaghetti squash strands) with 1/4 of the buffalo chicken mixture and sprinkle each with 1/4 c cheese.
  6. Place the spaghetti squash back in the oven and cook for another 5 – 10 minutes, or until the cheese melts.
  7. Garnish with sliced green onions and enjoy!
Serve this with
  • I serve this as a complete meal. If you’re looking to add something to the meal, a salad, corn on the cob, or a roasted vegetable would be great choices!

PGF: Spicy Meat Sauce

Posted on

A spicy tomato sauce that is ready to eat in under 20 minutes! Serve with GF pasta, wheat pasta, or spiralized vegetable noodles!

Gluten-Free-Spicy-Meat-Sauce-Front

I have a lot of fond memories of making this pasta sauce with my sister. As children we both enjoyed cooking but just could not manage to do it together. It always ended up with the two of us in a huge fight, stomping off to our rooms. For years we just avoided being in the kitchen together! Once we hit college age we managed to put our bad cooking experiences behind us and started working together in the kitchen. We developed a groove. I did all the work with raw meat and Lauren was in charge of all of the stirring. I often did cutting, she did measuring. Once we knew what we each liked and wanted to do in the kitchen working together was much easier! {Funny, as I type this I realize how similar this is to marriage. Figuring out HOW to work together is key!}

This spicy meat sauce was a favorite recipe for us to make together. I would add things to the pan and Lauren would stir it up. We had our jobs and it all worked out!

Spicy-Meat-Sauce-Gluten-Free-Pasta

What flavors inspired our meat sauce? Anything and everything spicy! Crushed red pepper flakes, chili powder, cayenne pepper, garlic . . . basically everything spicy that we could find in the cupboard. We’d shake in some spices, taste test, adjust seasonings, taste test, adjust seasonings, taste test . .. . you get the idea.

Spicy-Meat-Sauce-Close

Everyone we served the Spicy Meat Sauce to loved it! When I found out I had celiac disease, this was a familiar meal that was easily modified to meet my needs. I prepared the meat sauce as usual, but replaced regular pasta with gluten free pasta.

Spicy-Meat-Sauce-Gluten-Free-Tall

In 10 years, this Spicy Meat Sauce recipe hasn’t changed, but what I’ve served it over has. Before getting my celiac diagnosis 8 years ago I was crazy about pasta! Now, things are different. Often, I prepare this sauce with a pot of GF pasta and a pot of wheat pasta to make the meal Portionally Gluten Free (PGF). Gluten free spaghetti is expensive, but regular pasta is less than a dollar a box! That way I get to eat something safe for me, and my husband can chow down on pasta and sauce without breaking the bank. Making a PGF pasta dinner is surprisingly easy. I boil two pots of water. The GF pasta gets cooked in one pot and the wheat pasta in the other. I use separate stirring spoons for each pan. When the pasta is done cooking, drain and plate the GF pasta, followed by the wheat pasta (I highly recommend sing separate strainers for wheat and GF pasta. Read more about PGF specifics here).

Lately, I’ve been trying out this sauce with vegetable noodles. As a somewhat new spiralizer owner I’ve been making every veggie I can think of into noodles. Served with zucchini noodles, the meal becomes surprisingly analogous to the taste of regular pasta and sauce. Sweet potatoes noodles are a fun compliment for this spicy sauce. Add a little feta cheese for some saltiness and you’ll be in healthy pasta heaven!

Spicy-Meat-Sauce-Zucchini-Noodles-Tall

PGF: Spicy Meat Sauce

Ingredients
  • 1 lb ground beef or turkey
  • 1/2 large onion, diced
  • 4 cloves garlic, minced
  • 20 oz plain tomato sauce
  • 1/2 tsp crushed red pepper flakes
  • 3/4 tsp mexican seasoning
  • 1 1/2 tsp Italian seasoning
  • 1/2 tsp chili powder
  • 3 shakes cayenne pepper
Directions
  1. Put the beef/turkey in a non stick skillet (or regular skillet, with an added 1 tbs olive oil) over medium high heat. Brown the meat, breaking it into small chunks using a spoon/fork/spatula as it cooks.
  2. When most of the meat is brown, add the onions and garlic. Continue cooking until no pink remains.
  3. Add the tomato sauce and spices and stir.
  4. Reduce the heat to low and simmer for a few minutes up to 15 or 20 minutes.
  5. Serve with pasta (gluten free, or whatever works for your diet) or vegetable noodles. For a PGF meal, prepare gluten free and wheat pasta in separate pots using separate stirring utensils and strainers. Serve the GF pasta, topped with sauce before serving the wheat pasta topped with sauce.
Serve this with

Spicy Tomato Chicken Noodle Soup

Posted on

Over the past couple of weeks us folks in the south have been hit with a couple of very rare snowstorms. As a former northerner I’m not phased, and it’s actually exciting to see the snow again. Snow is uncommon here so there are no snow plows or salt trucks. Schools are closed and everyone gets sent home from work. It gets so hot and humid here in the summer, so I’m trying to live up this cold weather while I have the opportunity. I’m doing lots of awesome, and less awesome stuff, like drinking hot chocolate, eating lots of soup, and wearing fleece. Hence the chicken noodle soup. In a month or two it will be so hot I won’t be able to bear the idea of heating the house anymore and do all of my cooking on the grill. I’ve gotta eat soup now while I can!

Spicy Tomato Chicken Noodle Soup

When my sister, Lauren, found this recipe a long time ago it was just a regular chicken soup with some tomato soup added at the end. Lauren and I have a history of making everything spicy, and that’s exactly what we did with this recipe. We had a few go-to spice blends that we added to everything. One of us would stir and the other would shake in various amounts of these spices. Then we would taste, evaluate the flavor, and adjust accordingly. I love cooking this way, but it’s not exactly conducive to writing out a recipe. I finally took some time to measure out the spices that I use.

Spicy Tomato Chicken Noodle Soup 2

This recipe was an easy favorite to modify for a gluten free diet once I was diagnosed with celiac. Rather than using regular pasta, I subbed in GF pasta or even rice. To make this a portionally gluten free recipe separate the finished soup into two saucepans. Add GF noodles to one pan and wheat noodles into the other. Just be sure to boil the pasta in two separate pots and use two sets of utensils for preparing both pasta varieties!

This is not your ordinary chicken noodle soup. It has a good amount of tomato flavor and good kick of spice. This will warm you up inside and out. The chicken is cooked in broth and seasoning to amp up the flavor. Don’t let the large ingredients list and long set of directions scare you off. Over the course of the hour and a half it takes to prepare this soup you’ll only be actively involved for about 20 – 30 minutes.

Spicy Tomato Chicken Noodle Soup 3

P.S. If you’re curious about that foccacia bread in the photos check back on Monday for the recipe!

Spicy Tomato Chicken Noodle Soup

See post above for directions on how to make this meal portionally gluten free. If you’re not a fan of spicy soups leave out the crushed red pepper flakes and the cayenne pepper.
 
Ingredients
  • 6c water
  • 2 chicken breasts
  • 3/4 tsp garlic powder
  • 1 tbs parsley flakes
  • 3/4 tsp onion powder
  • 3 tsp chicken bouillon ( I use Better than Bouillon)
  • 3 Tbs olive oil
  • 1 onion, minced
  • 3 cloves garlic, minced
  • 3/4 c plain tomato sauce
  • 2 Tbs chili powder
  • 1/2 tsp red pepper flakes
  • 1 Tbs mexican seasoning (I have a McCormick Mexican seasoning, but any mexicany flavored seasoning will do)
  • 2 shakes cayenne pepper
  • 1 1/2 c cooked GF pasta or rice (see post above for PGF directions)
Directions
  1. Put the water in a large saucepan and add the garlic and onion powder, parsley flakes and bouillon. Bring to a boil and stir to dissolve the spices. cut each of the chicken breasts in half, add the the pot, and let simmer for 1 hour.
  2. Towards the end of the 1 hour of simmering, heat the olive oil in a medium skillet over medium heat. Once warm, add the onions and garlic and cook until softened, stirring frequently to keep the garlic from burning.
  3. Once the chicken has simmered for an hour remove it from the pan and shred or chop into bite sized pieces.
  4. Add the chicken into the pan, as well as the cooked onion/garlic. Add the tomato sauce, chili powder, red pepper flakes, Mexican seasoning, and cayenne pepper. Stir well.
  5. Add the cooked pasta or rice into the pot and let simmer for couple of minutes before serving.

Crockpot Buffalo Chicken

Posted on

This effortless, two ingredient buffalo chicken is easy to prepare whether you are cooking for 2 or 20!

Buffalo Chicken 5

This buffalo chicken is frequently cooking in my house. I’ve been making it since before I started this blog! Crockpot buffalo chicken recipes are rampant all over Pinterest and the internet in general, so I had no intention of posting my recipe and adding yet another version to the mix. Plus, my version is hardly a recipe. With only two ingredients and no exact measurements it hardly seems worth it’s own post.

Ultimately, I decided to post this for the sake of continuity. I have tons of recipes that I use this chicken in (like these buffalo chicken egg muffins). I honestly figured it would be easier for me as the recipe writer and you, as the readers, to have a buffalo chicken recipe right on this site to refer back if a recipe calls for buffalo chicken.

Although I do use this chicken as an ingredient in many recipes, it also makes excellent sandwiches. Just like any crockpot meal, let it cook all day and you’ll come home to a hot, ready to eat meal – just get out some bread and lettuce). This is also a super easy meal to make for a crowd. Whether you are cooking for 2 or 20 the prep time and cook time are exactly the same. New Years Party food, anyone?!

Buffalo Chicken 6

Speaking of prep and cooking, here’s how I make this amazingly delicious and moist chicken.

Buffalo Chicken 1

First, I trim any fat off the chicken and place in the the crock pot.

Buffalo Chicken 2

Next, pour in the hot sauce. You’ll want to pour it in until the chicken is just about covered.

Buffalo Chicken 3

Put the lid on the crockpot and cook for about 3-4 hours on high or 6-8 hours on low. I’ve found that the cook time varies depending on the thickness of the chicken (i.e. thick chicken breasts take longer to cook than thinner chicken cutlets). If you’re able, stir a few times during the cooking process – if not, no big deal.

When the chicken is done, shred it with a fork. You will know it is done because it will shred effortlessly when you stick a fork into a piece of chicken.

Buffalo Chicken 4

When you’ve shredded the chicken let it cook for about 10 – 15 more minutes until it has absorbed more of the liquid. If it looks a little dry, or you like really spicy food, you can add more hot sauce at this point.

Once the chicken has absorbed more sauce it’s time to eat or use in your recipe!

Buffalo Chicken 7

Crockpot Buffalo Chicken

Ingredients
  • Boneless skinless chicken (breasts or tenderloins)
  •  Frank’s Red Hot Sauce
  • GF & wheat bread for sandwiches (optional)
Directions
  1. Trim any excess fat off of the chicken.
  2. Place chicken in the crockpot. Pour hot sauce over the chicken until it is covered (see photo above).
  3. Cook 3-4 hours on high or 6-8 hours on low.
  4. Shred chicken with a fork and then cook for 10-15 more minutes to absorb more liquid.
  5. Serve with bread, lettuce, and condiments for sandwiches or use in a recipe.

Black Bean Quesadillas with Spicy Yogurt Sauce

Posted on

These tasty quesadillas are easy to transport, very filling, and totally appetizing hot or cold. They are perfect for an on-the-go snack or lunch, and a quick vegetarian dinner option, too!

This is a really busy time of year for everyone. It seems to be parties, church events, and travel keeping me busy this year. A couple years ago I was on the road for work every day between Thanksgiving and Christmas. It is not so simple for people on a gluten free diet to stop by the drive thru for lunch in the midst of shopping for Christmas gifts or eat your fills worth at a holiday party. There is more planning required.

I love these quesadillas for busy days. Once you’ve made the black bean mixture and the sauce it takes just a couple of minutes to cook them. Since they are self contained, kind of like a tortilla sandwich, they travel so easily. You don’t need to remember to bring a fork with you, or even need to heat these up in the microwave. Sometimes I cook the whole batch of these all at one time and keep them on hand in the fridge for a really quick and easy meal to bring with me when I will be out all day. Other times, I make the bean mixture ahead of time and then cook 3 or 4 tortillas worth of quesadillas at a time.

Black Bean Quesadillas

Have I mentioned how filling these are? Something about black beans always fills me up really quickly – anyone else experience that? I find that feeling full is GREAT when I am at a party or somewhere else with tons of food that I cannot eat. It helps me not feel so bad about missing out on all of that great food!

The quesadillas are good on their own, but even more excellent with this spicy dipping sauce. As a former Taco Bell employee I am very familiar with the different sauce. The Baja sauce is my favorite, but their quesadilla sauce is a close second. When I stumbled upon this recipe on Pinterest I knew I had to try it. I made a few modifications (mainly swapping out the sour cream for greek yogurt), and ended up with a healthier version of that yummy Taco Bell Quesadilla sauce. Yum!

Next time you need to bring a meal with you give this a try! A few of these quesadillas packed up with a dollop of this spicy sauce will keep you full and satisfied!

2013-12-07 16.01.35

P.S. My eBook is now available on Kindle! You can also purchase it for $1 off the Kindle price here. Check it out for your holiday baking!

Black Bean Quesadilla with Spicy Yogurt Sauce

Ingredients (makes 12 quesadillas and 1/2 c of sauce)


For the Spicy Yogurt Sauce

  • 1/2 c plain greek yogurt
  • 1 Tbs jalapeno, roughly chopped (more or less, to taste)
  • 1 tsp garlic powder
  • 1/2 tsp cumin
  • 1/2 tsp paprika
  • 4 shakes cayenne pepper (optional)
  • 1/4 tsp salt

For the Quesadillas

  • 15.5 oz can black beans, rinsed and drained
  • 1 small onions, finely chopped (about 1/2 c)
  • 1/3 c cilantro, chopped
  • 1/2 tsp garlic powder
  • 1 tsp cumin
  • 1 tsp chili powder
  • 1 Tbs lime juice
  • 1/2 c shredded mexican cheese blend
  • 12 corn tortillas
  • cooking spray
  • salt
 
  1. In a blender or food processor combine all of the sauce ingredients and mix until smooth and well combined.
  2. In a medium sized bowl mix the first eight quesadilla ingredients.
  3. Heat a skillet over medium heat. When it is warm, spray with cooking spray and place a tortilla flat in the pan. Spray the tortillas with cooking spray and sprinkle with salt. Flip the tortillas over using a spatula. Scoop about two tablespoons of the bean mixture onto on half of the tortilla. The amount of mixture you use for each tortilla may be more or less, depending on how large your tortillas are. Using the spatula, fold the tortilla in half over top of the bean mixture and preww the top down with a spatula.
  4. Let the quesadilla cook for a minute or two, until the bottom is brown (just light the edge up a little bit with a spatula to check), then flip and let the other side brown.
  5. Repeat steps 3 and 4 with the remaining tortillas.
  6. Serve with the spicy yogurt sauce.

Magic Dragon Noodles

Posted on

IMG_4426 copy

I saw these Dragon Noodles on Budget Bytes and so wanted to eat them. Quick and spicy noodles? I’m in! Chances are that if you are reading this blog you know that GF noodles just don’t always cut it. Sometimes you can sub them into a recipe and no one is the wiser (like casseroles), but other times the results are undesirable. Mushy, overcooked noodles that are all stuck together – anyone else have that happen to them?

IMG_4413 copyEnter Miracle Noodle! Have you heard of these? They are GF, don’t need to be cooked like regular noodles, and have zero calories. These aren’t a great substitute for noodles all around, but they are awesome for stir-fry like dishes. The noodles will heat up right in the frying pan along with any sauce, meat, and veggies you want to add.

That’s part of why I call these noodles “magic”. You literally just open up the package and heat them up on the stove or in the microwave. Then there’s the whole calorie-less noodles thing. It’s easy to rationalize the butter and eggs that go into the sauce when you know you have saved so many calories! Finally, this is just so quick and easy to prepare! When you get a tasty, low calorie meal in under 10 minutes I would say that is pretty darn magical!

IMG_4436 copyThe sauce on these noodles is super spicy! If you enjoy hot and spicy foods then you will love this. If you’re not so keen on that then cut down on the sriracha and you’ll enjoy this much more.

IMG_4417 copy


Magic Dragon Noodles

 
Recipe Inspiration: Dragon Noodles on Budget Bytes
 
Ingredients
  • 1 package of Miracle Noodles
  • 1 Tbs butter
  • 1 egg
  • 1 Tbs brown sugar
  • 1 Tbs soy sauce (or Bragg’s Amino Acid)
  • 1 Tbs sriracha
  • 3 Tbs chopped green onions
Cooking Directions
  1. In a small bowl combine brown sugar, soy sauce, and sriracha.
  2. Melt butter in a medium sized skillet over medium heat.
  3. When butter is melted add the egg and scramble.
  4. Once the egg is cooked add the noodles and sauce to the skillet and stir to combine.
  5. Top with green onions before serving.

Sweet & Tangy Thai Chicken with Rice and Edamame

Posted on

Image

As a gardener, one of my dreams is to have huge, bushy basil plants. I LOVE to use fresh herbs in cooking. It’s so exciting to go outside, snip a few leaves off for tonight’s dinner, and be able to do the same thing tomorrow, and the next day, and the next day . . . 

This year I have three types of basil in my garden: Genovese, Lemon, and Thai. Each of my plants if huge! A gardener/cook’s dream come true! I’m taking every opportunity to use my fresh herbs. 

Image

My Thai basil plant that is providing me with tons of fresh basil!

So, Thai food is tasty. Wether it’s sweet or spicy that you desire, there is something in Thai cuisine for you. There’s a Thai restaurant nearby that we go to from time to time. They offer four levels of spiciness: mild, medium, American hot, and Thai hot. My husband will get something mild with a sweet sauce. I get my food American hot with garlic and soak up as much of the spicy sauce as possible with tofu. We obviously have different flavor preferences! 

As I’m exploring different ways to use my Thai basil I set out to create something we would both enjoy. This was definitely a hit. The rice and edamame is coated in a sweet Thai chili and peanut sauce. The chicken is marinated in spicy asian sauces. The combination was amazing. 

Image

The grilled chicken. I recommend using a flat, metal skewer, like this one.

I topped mine with . . . you guessed it . . . Thai basil! If you don’t have access to fresh Thai basil you can also get it in a jar some grocery stores. You can also sub in a more common basil.

ImageMy husband mixed his food all together and added some extra sweet chili sauce.

ImageNow, this recipe might seem daunting with all the different flavors and sauces. Think of it this way: You’ll mix up the chicken marinate the night before. It’ll be quick. When you are ready to make the rest of the meal, you will already have some of the work already done. The rice and edamame cook in the same pot, so you’ll just mix the sweet chili sauce and grill the chicken while it’s simmering. I promise; the flavors are worth the effort!

ImageSweet & Tangy Thai Chicken with Rice and Edamame

Ingredients
Marinade:
  • 1 tsp chili garlic paste (or more, to taste)
  • 2 Tbs lime juice
  • 2 Tbs fish sauce
  • 2 cloves garlic, minced
  • 1/2 tsp crushed red pepper (or more, to taste)
  • 2 shakes cayenne pepper

Sweet Chili Sauce

  • 1/2 tsp sugar substitute or 1 Tbs sugar
  • 1/2 tsp ginger, minced
  • 1/2 tsp garlic powder
  • 1 tsp peanut butter
  • 1 1/2 Tbs lime juice
  • 1 Tbs milk
  • 1/2 Tbs distilled white vinegar
  • 2 Tbs sweet chili sauce


  • 3 chicken breasts, cut into bite sized pieces
  • 1c brown rice
  • 2c water
  • 1c edamame (I used frozen)
  • 1/4c cilantro, chopped
  • 1/4c thai basil, chopped
  • 1 bunch of green onions, top half, chopped
Cooking Directions:
  1. Mix marinade ingredients. Add chicken chunks to marinade and refrigerate overnight.
  2. Mix the sweet chili sauce, and chop the cilantro, Thai basil, and green onions if you haven’t already done so.
  3. Bring the rice and water to a boil in a large saucepan. When it boils, reduce heat to low and cover.
  4. While rice is cooking, skewer the chicken (I use flat metal skewers) and grill. I use a gas grill, between 350°F and 400°F. It takes a few minutes on each side to cook through).
  5. When rice has nearly absorbed all of the water, stir the edamame into the pot.
  6. When rice is fully cooked, stir in cilantro, Thai basil, green onions, and the sweet chili sauce you mixed.
  7. Serve with the grilled chicken. Top with additional herbs or sweet chili sauce, if desired.


Not Pad Thai Noodles

Posted on

Image

This is not Pad Thai. I’m not sure what it is! I created this meal out of a concoction of several other recipes, mainly to satisfy my cravings for both soft and spicy foods. Each time I make it, though, my husband refers to it as Pad Thai. While this dish does have some of the same flavors as Pad Thai, a few of the important ingredients in Pad Thai are missing; peanut and bean sprouts. So, I’ve named it “NOT Pad Thai”. At least if I don’t know what it is I can tell you what it is not.

Similar to Pad Thai or other Thai noodle dishes, this recipe suits rice noodles very well. If you’ve ever cooked with rice noodles before you know that they do not behave like any normal wheat pasta. They tend to stick together immediately once they have finished cooking and are drained. The sauce and the butter are really the key ingredients to making this recipe a success. Combined, they have a smooth, slippery texture that coats all of the noodles and meat evenly and easily. No piles of rice noodles stuck to each other (I happen to love noodles stuck together, actually, especially fettuccine!) or tasteless portions of food. Another way I combat the sticky noodles is by breaking the noodles up before cooking them. This makes it much easier to stir in the sauce.


Now, a warning about this sauce. It is yummy, but IT’S SPICY, clear out your sinuses spicy! I’ve included the measurements I use when I make this and a toned back version. The key players in the spiciness are the crushed red pepper and sriracha, so just start with a bit of each of these if you are nervous about the heat level. You can always add more, but you can’t take spice out!

I’ve also written this recipe to include beef. Chicken works, too! Or try the noodles alone! If you want to get closer to that Pad Thai taste, try adding some chopped peanuts or serving with bean sprouts. I think you will find that whatever the heck this noodle stir fry is, you’ll get your fill of spice without sacrificing on taste.


Not Pad Thai Noodles


Image

Ingredients
  • 1/3lb wide rice noodles broken into pieces
  • 3/4 lb thin sliced beef in 1 inch strips 
  • 4 tbs butter
  • 1/2 tsp crushed red pepper (1/4 tsp or less for toned down version)
  • 3 eggs
  • 3 tbs brown sugar 
  • 3 tbs soy sauce/Bragg’s Amino Acids (2 tsp for toned down version)
  • 2.5 tbs sriracha (2 tbs for toned down version)
  • 1/4c chopped cilantro
  • 1 tbs sesame oil
  • 4 green onions, chopped
Cooking Directions
  1. Make the sauce by mixing brown sugar, soy sauce, and sriracha.
  2. Boil water for noodles in a medium pot. Cook noodles until al dente (check often – the noodles will get soggy easily).
  3. When the water nears boiling, heat the sesame oil in a large skillet over medium/high heat.
  4. When oil in skillet is hot and rippling and beef strips. Cook, stirring often, until no pink is visible.
  5. Remove beef to a plate and melt butter in the skillet the beef was in.
  6. When butter is melted, add the crushed red pepper.
  7. Add the eggs into the pan and scramble them. A few stirs is all it will take.
  8. When everything is done – eggs, beef, and noodles – combine it all in the skillet with the eggs. Add the sauce and stir to coat. This may take a few minutes.
  9. Top with cilantro and green onions.