RSS Feed

Tag Archives: vegetarian

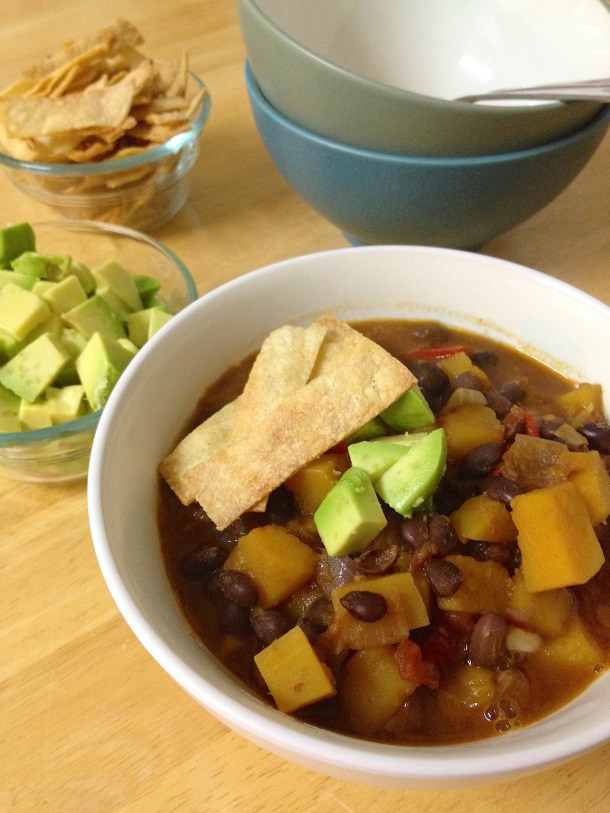
Chipotle Butternut Squash Chili

Posted on

This recipe is the seventh in my month-long series of healthy, weeknight recipes from all around the web. This is stuff I make time and again, usually with some modifications, and still love! Check back (or follow this blog) to see all of the recipes I’ll be featuring this month!

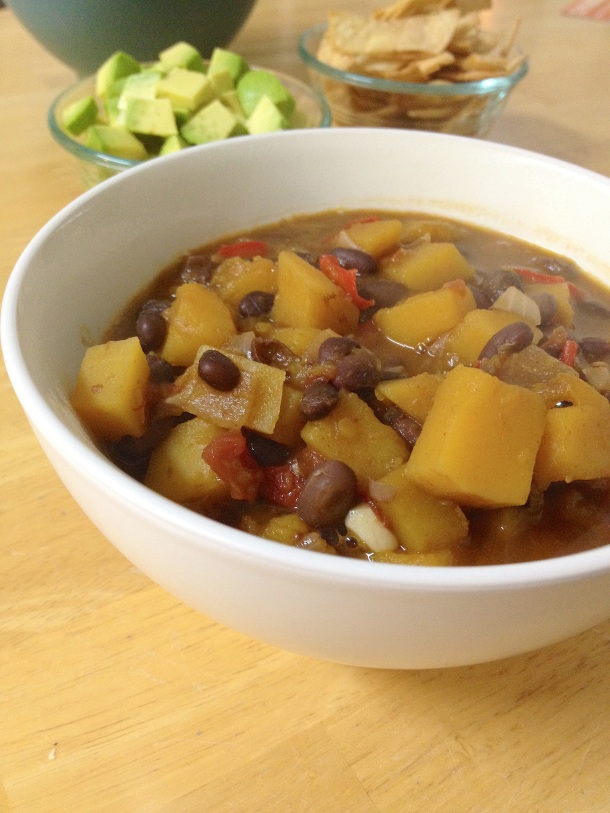
Chilpotle-Butternut-Squash-Chili-Front

This is one of my more recent “favorite recipe” discoveries. I love squash and chili, so even though this is a meatless (and vegan) recipe I knew I wanted to try it when I spotted it. I think Steve and I were both a little bit nervous, as I added non-meat ingredients to the pot, that it wouldn’t satisfy us. The chili smelled SO good while it was simmer on the stove, and once I tasted it I was not disappointed.

This chili works so well because there is good flavor and lots of textures, just like any other great chili. There’s a good amount of chopping and dicing involved, but then everything just simmers on the stove for a while. I think of squash as something that takes a long time to cook, but in this case it really doesn’t take more than 30 minutes or so. A super flavorful chili in under an hour? Sounds good to me!

This recipe is from Cookie + Kate and I’ve hardly modified it (and I, somehow, tend to modify even the best recipes, so this is really saying something!). I’ve changed very little about the flavors, mostly just the ratios of different ingredients. Red peppers are crazy expensive here, and I can never find a squash as small as the recipe calls for, so I add more squash and less red pepper. I tend to increase the amount of onion, too, because we just love onions. Don’t skip the crispy tortilla strips!!! I typically cut up 2 tortillas, when the chili is almost done, spray with olive oil, sprinkle with salt, and put them in the toaster oven until crispy. It really adds a nice dynamic to the taste of the whole bowl of chili.

Chipotle-Butternut-Squash-Chili-Gluten-Free-Vegan-Vegetarian

Chipotle Butternut Squash Chili

Recipe Source: Cookie + Kate

Ingredients

  • 1 red onion, diced
  • 1 red bell pepper, diced
  • 1 butternut squash (in the 2 lb. range), peeled and diced
  • 4 cloves garlic, minced (I’ve also subbed in about 2 t garlic powder)
  • 2 T olive oil
  • 1 T chili powder
  • 1 t cumin
  • 1/2 chipotle pepper in adobo, minced (add more or less to taste)
  • 14 oz can petite diced tomatoes (liquid included)
  • 3 c cooked black beans (or 2 cans)
  • 14 oz vegetable broth (my preference is 2 c water + 2 tsp better than bouillon)
  • 2 corn tortillas
  • 1 avocado, diced

Directions

  1. Heat the olive oil over medium heat in a large pot (dutch oven, stock pot, etc.).
  2. When the oil is warm add the diced veggies: red onion, red bell pepper, butternut squash, garlic. Cook, stirring every minute or two, just until the onions start to soften.
  3. Add the cumin, chipotle pepper, tomatoes, black beans, and broth. Stir well. Bring to a boil, then reduce to medium low heat (basically, a simmer) and cover. The chili is done when the butternut squash is soft and tender.
  4. As the chili is nearing being done, make the tortilla strips. Spray each tortilla with olive oil spray and spinkle with salt. Cut into strips. Bake at 350° F for about 12 minutes, or until crispy and golden brown (I use my toasted oven for this).
  5. Serve chili with the tortilla strips and the diced avocado.
Healthy Twice Baked Sweet Potatoes

Posted on

My first healthy favorite for January are these Healthy Twice Baked Sweet Potatoes. I promised quick, healthy, weeknight recipes and although this takes about an hour to cook I think you’ll find that it’s still a great choice. Most of the time is hands off baking time while the sweet potatoes are in the oven. Set a timer, walk away, and do something else!

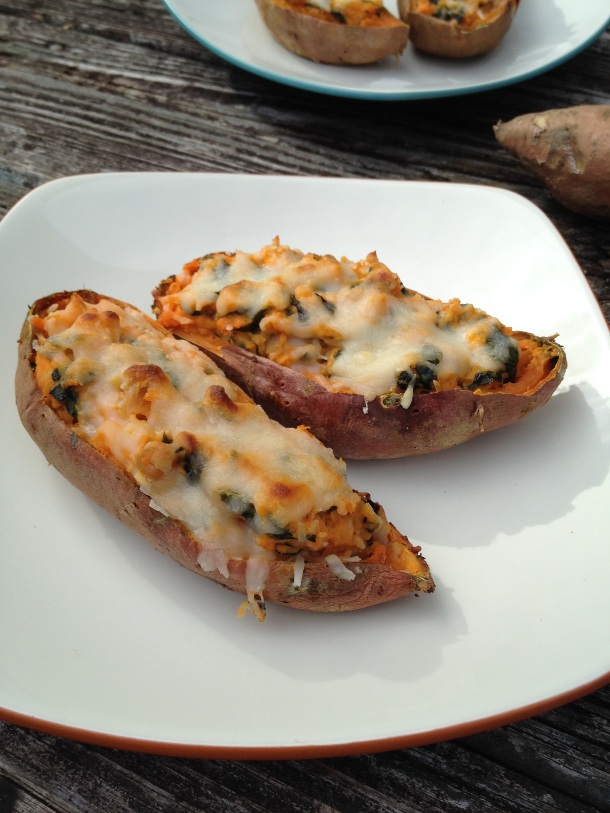
Healthy-Twice-Baked-Sweet-Potatoes-Gluten-Free-Vegetarian-2

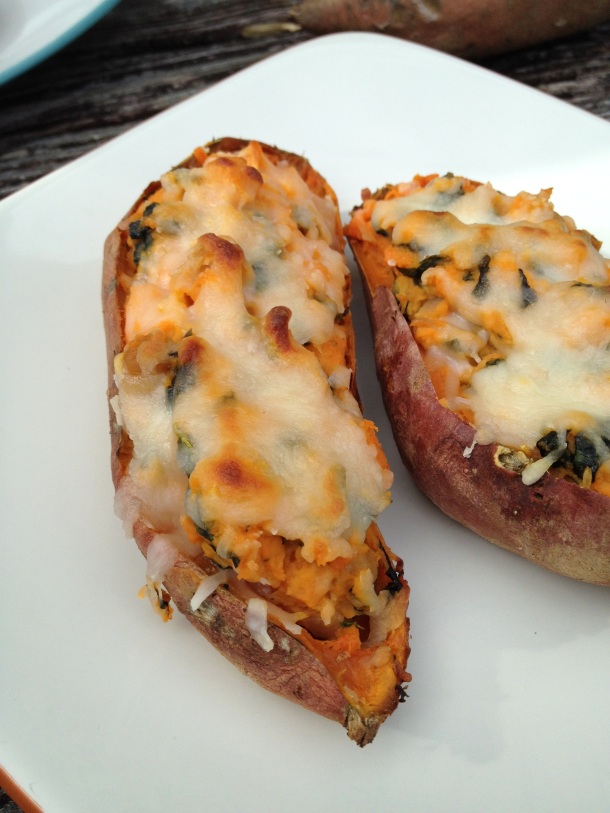
Don’t be fooled by the cheese topping, these sweet potatoes are still healthy! Just a tablespoon of mozzarella per sweet potato is a great way to add another flavor and saltiness without becoming overly indulgent.

This recipe is adapted from Pinch of Yum. It is naturally gluten free, as written. I’ve increased the recipe size to make more servings and swapped out a few ingredients for healthier counterparts that I always have on hand.

My favorite part about this recipe is how filling it is! The sweet potatoes are so tasty, yet I’m usually stuffed after eating just two. The leftovers are so great warmed up in the toaster oven for a few minutes, too!

Healthy-Twice-Baked-Sweet-Potatoes-Gluten-Free-Vegetarian

Healthy Twice Baked Sweet Potatoes

Sweet Potatoes vary greatly in size, so consider all the measurements in this recipe approximate. If you feel the ratio isn’t going to be quite right adjust as necessary. As long as you don’t change the baking times, you should end up with a good result!

This recipe is adapted from Pinch of Yum’s Healthy Sweet Potato Skins. Thanks for the great recipe inspiration!!! 🙂

Ingredients

  • 5 sweet potatoes
  • 1 tbs olive oil
  • 2 shallots, minced (you can also use 1 small onion)
  • 10 oz spinach, roughly chopped
  • 1/2 c plain greek yogurt
  • 1 can chickpeas, rinsed and drained
  • 1/2 c mozzarella cheese, divided

Cooking Directions

  1. Preheat the oven to 350° F.
  2. Wash the sweet potatoes and poke each potato several times with a fork. Bake the potatoes for about 1 hour, or until they are soft and tender.
  3. Towards the end of the baking time cut the shallots and spinach.
  4. Heat the olive oil in a skillet over medium heat.
  5. When the oil is hot add the shallots and cook for about 5 minutes, or until the shallots are fragrant and tender.
  6. Add the spinach and cook, stirring, until the spinach is wilted. Remove from heat.
  7. When the potatoes are done cut them in half. Scrape out the insides (put in a large bowl), leaving about a half inch around the skins to hold the shape of the potato.
  8. Mash the removed sweet potato, and add the greek yogurt. Stir in the shallot/spinach mixture and chickpeas.
  9. Fill each the empty potato skins with the sweet potato mixture. Sprinkle about a tablespoon of the mozzarella onto each potato skin.
  10. Bake for an additional 10 minutes, or until the cheese is melted.

Thai Chili Tofu with Kale & Quinoa

Posted on

A clean, healthy, and nutritious dinner seasoned with a Thai-inspired sauce. Vegetarian, vegan, gluten free and guilt free!

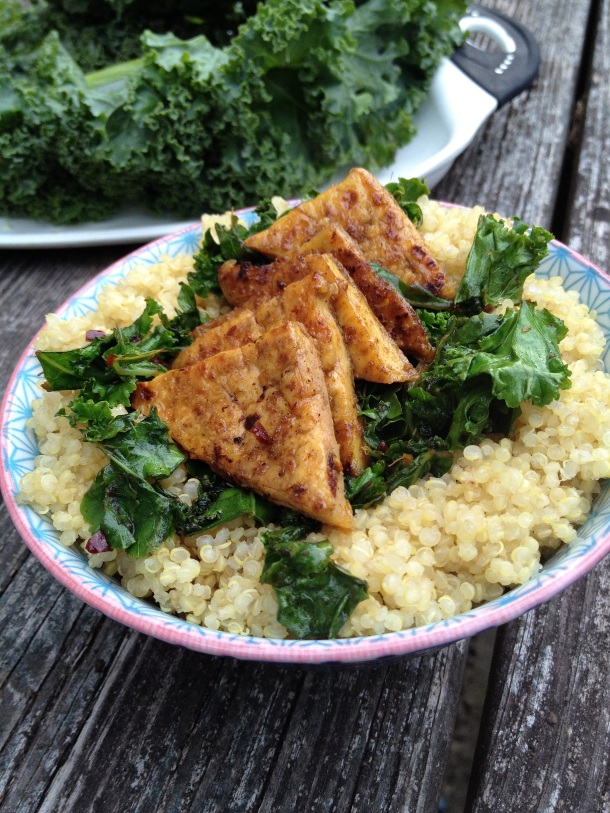
Thai-Chili-Tofu-Kale-Quinoa-Front

To be honest, I don’t know a lot about cooking with tofu. I only have a handful of tofu recipes, most of which my sister has sent me and (no offense, sis) have been difficult to successfully make gluten free. Back in January, when I did a Daniel Fast, I started playing around with tofu a bit more, and found this delicious recipe from VeganYumYum. It was so good, I’ve made it over and over again since then, even after the Daniel Fast was done.

Thai-Chili-Tofu-Quinoa-Kale-Kale

As I made this recipe over and over, I was never actually truly following the recipe. The original recipe calls for collard greens, but I had kale on hand, so I just used that. Rather than season the kale with lime juice I just sauteed it with a little garlic and crushed red pepper (my go-to kale seasoning). As for the quinoa, well, I just skipped the seasonings all together. I’m sure they would be delicious, but cardamom is just too expensive for me! I made a couple of minor changes to the tofu part of the recipe, also. I’m sure the original version is delicious (even though I’ve never actually tried it)! This version is, too!

Thai-Chili-Tofu-Quinoa-Kale-chopsticks

The invaluable lesson I learned from making Tofu dish over and over is the technique of dry-frying tofu. I was used to this soft, squishy, falling-apart tofu, and honestly, that isn’t incredibly appetizing. Now, dry-fried tofu, that is something totally different. Tofu prepared in this way has a texture very close to chicken. Because of it’s nature, it still basically functions like a little sponge that absorbs up flavor. The best of both worlds: great texture and great flavor! As I’m typing this I’m wondering “why do I not use dry fried tofu in more recipes”.

Thai-Chili-Tofu-Quinoa-Kale-Close

Another benefit of tofu? It’s cheap. At least here, a pound of tofu is nearly half the price as a pound of chicken or beef.

Thai-Chili-Tofu-Quinoa-Kale-Over

What makes this meal is not so much the tofu though, but the sauce. It’s so simple – just 5 ingredients you probably have in your pantry/fridge. When the sauce is mixed, and poured over the cooked tofu it soaks in a bit a forms a sort of glaze. The tofu + glaze is wonderful on it’s own, but to get the best result mix it with the kale and quinoa. It all blends perfectly, and is one of the best vegan meals I’ve ever had!

And for what it’s worth, my meat-loving spouse enjoys this dinner just as much as I do. It’s that good!

Thai-Chili-Tofu-Quinoa-Kale-Square

Thai Chili Tofu with Kale & Quinoa

Serves 2 – 3 adults.
 
Ingredients
  • 2/3 c quinoa, uncooked
  • 1 1/3 c water
  • 1 lb extra firm tofu
  • 4 c kale, roughly chopped
  • 1 tsp Sweet Leaf Stevia blend (or use 1 Tbs sugar)
  • 1 1/4 tsp garlic powder (divided)
  • 3/4 tsp crushed red pepper flakes (divided)
  • 3 T soy sauce (I use Bragg’s Liquid Aminos)
  • 2 T lime juice (approx. juice from 1 lime)
  • 1 Tbs olive oil or coconut oil
Directions
  1. Add the quinoa and water to saucepan. Heat to boiling, then reduce the heat to low, cover, and let simmer. (The quinoa will likely finish before the tofu and kale is done. Feel free to start the quinoa closer to the serving time if you’d like. If your quinoa finishes early, no worries. Just turn the burner off, but leave it covered, in the pan and it will stay nice and warm.)
  2. In a small prep bowl mix the stevia, 1 tsp garlic powder, 1/2 tsp crushed red pepper flakes, soy sauce, and lime juice.
  3. Cut the tofu into bite sized pieces, and lay it in a single layer in a non-stick skillet.
  4. Turn the burner to medium high. As the tofu cooks, press it gently with a spatula, periodically. This releases some of the water in the tofu. Check the bottom side of the tofu, and when it is browned a bit flip all of the pieces. Repeat the same gentle pressing on this side, cooking until the bottoms have also browned. This whole procedure takes about 15 minutes give or take a few minutes.
  5. When both sides of the tofu have cooked, add the sauce into the pan and stir to coat the tofu with the sauce. Keep cooking, stirring, until the sauce has thicken and formed a glaze on the tofu, about 5 minutes.Remove the tofu from the pan.
  6. Add the oil to the same skillet, followed by the kale. Toss the kale with the oil, and cook, stirring constantly until the kale has softened and wilted some. Cook shorter for crisper kale and long for softer kale (I taste test mine to gauge when it is done). Stir in the remaining 1/4 tsp of crushed red pepper flakes and 1/4 tsp of garlic powder.
  7. To serve, spread quinoa on each plate, and top with some of the kale and tofu.

Tomato & Asparagus Risotto

Posted on

Here’s a risotto recipe that is healthy, not indulgent. It’s creamy and smooth, like any risotto should be, but there’s no cheese or dairy in sight. This makes a great lunch or side dish. It’s naturally vegetarian, gluten free, and dairy free. Perfect use for that spring, framer’s market asparagus!

dOe1x

Back in college, I had a great tomato risotto recipe. I can remember preparing it on my parents range, along with some chicken. It was just as yummy as the cheese-laden risottos I often made at that time, but so much healthier. I’ve searched far and wide for that recipe and have yet to find it. I finally decided it was time to stop the search and use my cooking skills to come up with my own tomato risotto recipe.

Tomato-Risotto-With-Asparagus-Gluten-Free

I’ve tested this recipe a few times, with a few different ingredient variations, and it seems to be foolproof. Add some broth and a tomato-y liquid. Stir. Keep stirring. Add more liquid. It’s simple. For the broth, I’ve used stock from a carton as well as Better Than Buillion + water, with identical results. Homemade stock would be great here, too!

To get the tomato flavor you can use a plain tomato sauce or a pasta sauce. The pasta sauce had tons of flavor from the herbs and spices, but that trade off was a more processed meal with higher calories. When I used plain old tomato sauce I added a bit of Italian seasoning (I used Penzey’s Frozen Pizza Seasoning that I just got a few weeks ago), just for fun.

Tomato-Risotto-with-Asparagus-Close

Serve with asparagus on top like I did or stir the asparagus spears into the risotto. The crisp asparagus with the smooth risotto do go wonderfully together. Pair with a clean eating protein of choice and you’ll have a well rounded, clean, healthy, meal!

Tomato-Risotto-Tall-Gluten-Free

Tomato & Asparagus Risotto

Ingredients (serves 4)
  • 1 c arborio rice
  • 2 c chicken or vegetable stock (read label to verify that it is gluten free)
  • 20 oz tomato sauce or spaghetti/pizza sauce (read label to verify that it is gluten free)
  • 3 cloves garlic
  • 2 shallots (may replace with an onion)
  • 1 Tbs olive oil
  • 1/2 bunch asparagus, cut into spears
Directions
  1. Finely mince the garlic and shallots.
  2. Heat the olive oil in a medium to large sized skillet, over medium heat. When the oil is warm, add the garlic and shallots. Cook for about 5, stirring frequently, until both garlic and shallots have softened some.
  3. Add the rice to the skillet, and stir very frequently. Watch for the edges of the rice to turn translucent.
  4. When the majority of the rice has turned translucent on the edges, add about half a cup of the stock. Keep stirring. It will likely absorb into the rice very quickly. When most of the rice is absorbed, stir in another half cup of stock. Keep stirring frequently (if not constantly) while the rice absorbs the stock.
  5. For the rest of the cooking time, alternate between adding tomato sauce and stock each time the liquid the liquid has absorbed, stirring very frequently. The liquid will most likely be absorbing slower than it was at the beginning, but keep adding it!
  6. When you’re on the final liquid addition, it’s time to cook the asparagus. Lay it in a small skillet in a single layer, and fill the skillet with water, just enough to cover the asparagus. Heat to boil, and then reduce to medium heat. Simmer for about 5 minutes, until the asparagus is soft, but still has a bit of a crunch. Test firmness using a fork.
  7. Drain the asparagus in a strainer. Either stir it into the finished risotto or just lay it on top.

PGF: Macaroni & Broccoli

Posted on

Macaroni-&-Broccoli-Both

Macaroni & Broccoli is a quick, healthy pasta dinner. It can be difficult to make a quick GF dinner, and even more tricky if you’re trying to make that meal healthy, too. Since the base of the dish is pasta and there are no strong flavors this healthy, gluten free dinner will please picky eaters, too.

Really, this is so simple to make that it hardly needs a recipe. I set two pots of water on the stove over high heat. While the water is coming to a boil I chop some broccoli florets and garlic. When the water is boiling I add some brown rice pasta to one pot, some regular pasta to the other and steam the broccoli. If I’m not feeling lazy I may saute the garlic in a little oil, but it’s not a necessary step.

Macaroni-&-Broccoli-Tall

It goes without saying that you NEED to be careful when cooking GF pasta and wheat pasta side by side. Use two separate pots and get out two separate stirring spoons. I like to keep my GF pasta, pot, and stirring utensil on one side of the stove and the wheat-laden food on the other side. Package up any leftover pasta right when you are done with it to avoid any cross contamination! I time the pasta cooking times so that the GF pasta will be done first. I drain it, put in on the table, and then drain the wheat pasta when the GF portion is totally out of the way. If you take these simple precautions to avoid cross contamination your meal will be safe! (Of course, you could also make this meal entirely with GF pasta, or even entirely with wheat pasta if you don’t have a gluten intolerance).

Once the pasta is cooked I stir some broccoli and garlic in to each pot and dinner is ready! Super easy and dinner will be on the table in under 30 minutes! For a fuller meal, serve with a salad and some grilled chicken. You’ll still have a quick, simple dinner!

Macaroni-&-Broccoli-Close

PGF: Macaroni & Broccoli

See post for additional tips on safely cooking GF and wheat pasta simultaneously.
 
Ingredients
  • 1 c GF pasta
  • 2 c wheat pasta
  • 1 large or 2 small heads of broccoli
  • 2 cloves garlic
  • 1 tbc olive oil
Directions
  1. Fill two saucepans with water and heat over high heat.
  2. While waiting for the water to boil, cut the broccoli into small florets and mince the garlic.
  3. Place the broccoli florets in a steamer basket. Fill another sauce pan with an inch or two of water and put the steamer basket in the pan. Heat to boiling, and then reduce the heat to low and let the broccoli simmer for about 8 minutes, until tender. Remove from heat. (See this post for step-by-step instructions on steaming broccoli).
  4. In a small bowl, mix the minced garlic with the olive oil. If you’d like, you can saute the garlic and oil in a small saucepan over medium heat, until the garlic has softened, but this step is not required.
  5. When the pasta water is boiling, add the GF pasta to one pan and the regular pasta to another. Stir each, being sure to use separate stirring utensils. Cook each pasta according to package directions and then drain, starting with the GF pasta.
  6. Return the pasta to their respective pots. Add about 1/3 of the broccoli and 1/3 of the garlic/oil mixture to the GF pasta. Stir until the oil has coated the pasta.
  7. Add the remaining broccoli and garlic/oil to the regular pasta and stir to coat the pasta with the oil.

Curry Lentils with an Egg

Posted on

I found a recipe for Spiced Lentils with Eggs on theKitchn a while back. I loved the idea, but when I tried the recipe I wasn’t a fan of the garam masala taste. I add garam masala to flavor plenty of foods, but it’s not something I love as a main flavor (that’s just me – if you enjoy give the original recipe a try). I added some curry powder to my next batch and this time I did love the flavor!

Curry Lentils with an Egg 1

While my curry flavored lentils with an egg were delicious, I knew that as a meal it was really lacking in the vegetable department.  Adding an onion and some leafy greens made me feel a lot better about the vegetable content of this as a meal.  I’ve used both spinach and kale successfully – delicious either way!

Curry Lentils with an Egg 2

This meal is cooked in two steps. First, the lentils, spices, and vegetables are combined and cooked. The second step is to bake the lentil mixture, topped with an egg. You can bake the lentils in 4 or 5 ramakins right after preparing the lentil mixture on the stove or store the mixture in the refrigerator until you are ready to bake it. Since I eat this one serving at a time I tend to store a big container of the lentils in the refrigerator. When I’m need a lunch I scoop some into a ramakin, microwave it for 2 minutes to warm up the lentils, crack the egg on top, and then bake. I know it sounds weird to microwave something before baking it, but I’ve found that this method really works the best when using refrigerated lentils. Otherwise, the baking time ends up being much longer.

Curry Lentils with an Egg 3

This has quickly become one of my favorite lunches. The curry lentils are so good on their own, and even better with an egg. It’s something about the smoothness of the egg against the spices and slight firmness of the split peas. I find myself fishing through my eggs looking for the largest ones each time I’m making this, just so I get more to eat!

Curry Lentils with an Egg 4

Curry Lentils with an Egg

modified from The Kitchn.
See post for modifications for baking one serving at a time.
 
Ingredients
  • 1 tbs olive oil
  • 1 onion, minced
  • 1 c red lentils
  • 1 c green split peas
  • 1 tsp garam masala
  • 1 tsp garlic powder (or a minced garlic clove)
  • 1 1/2 Tbs curry powder
  • 4 c chicken or vegetable stock
  • 1 c chopped spinach or kale
  • 1/3 c chopped cilantro
  • 4 eggs
  • salt and pepper for seasoning (optional)
Directions
  1. Heat the olive oil in a medium/large saucepan over medium heat. Add the onion, stir, and cook a few minutes until the onion is softened.
  2. Add the lentils, split peas, broth and stir. Stir in the garam masala, garlic powder, and curry powder. Bring to a boil. Cook for about 30-45 minutes. The red lentils will cook down into a mush and the split peas will be the texture of al dente pasta.
  3. Stir in the spinach/kale and cilantro.
  4. Preheat oven to 350.
  5. Grease 4 small ramekins or glass dishes and scoop lentil mixture into each. Crack and egg on the top of the lentils, and sprinkle with salt and pepper.
  6. Bake for about 20 – 30 minutes, or until the egg is opaque and mostly set. Let sit for a few minutes before eating to let the egg finish cooking.

P.S. I’m going to use this recipe for my submission to this week’s Gluten Free Wednesday at Gluten Free Homemaker. Thanks to Linda for organizing the event! Check out the event; there are lots of great recipes and meal ideas there!

Black Bean Burrito Bowls

Posted on

I posted a picture of these burrito bowls in one of my Daniel Fast updates. Last week I shared my personal favorite version of Cilantro Lime Rice. Now, here’s an entire-meal application for that rice!

Black Bean Burrito Bowl 2

These burrito bowls are healthy and delicious. I’m thinking as I’m typing this that I rarely believe it when other bloggers say that same thing. A bunch of vegetables usually tastes like a bunch of vegetables. The pictures always look nice but that doesn’t mean I’m actually going to want to go chow down on a big bowl of vegetables. The difference (for me at least) between these burritos and other health foods is that they are seasoned very well. I usually love to put taco sauce and cheese on anything Mexican-ish but I wasn’t missing either of those in this bowl. The seasoned black beans and the cilantro lime rice together in one mouthful was plenty of flavor! And thinking about it, that’s why I add all the cheese and taco sauce to a regular burrito – because I’m trying to pack in more flavor.

As is, this dinner is gluten free, egg free, dairy free, soy free (I think – PLEASE correct me if I’m wrong!!), nut free, vegetarian, and vegan (again, I think – If I’m wrong let me know)! Everything in this recipe is a whole food or spice. Don’t you love knowing that you are putting real food into your body? I know I do.

My half-eaten bowl.

My half-eaten bowl.

Of course, depending on your preferences you could add any number of things to these bowls. Tomatoes or green onions, broken up tortillas chips for some crunch, shredded cheese, hot sauce, etc. You could even add lettuce for a taco salad. The options are endless!

Black Bean Burrito Bowl 1

Black Bean Burrito Bowls

Ingredients
  • 1 onion, diced
  • 1 Tbs olive oil
  • 1 Tbs chili powder
  • 1/4 tsp garlic powder
  • 1/4 tsp onion powder
  • 1/4 tsp crushed red pepper flakes
  • 1/2 tsp paprika
  • 1 1/2 tsp cumin
  • 1 tsp salt
  • 16 oz. can black beans, drained and rinsed
  • 2 Tbs water
  • 1 c frozen corn, defrosted
  • 1 avocado, cut into cubes
  • 1 recipe Cilantro Lime Rice
Directions
  1. Heat the olive oil in a skillet. When the oil is hot add the onion and cook until softened.
  2. While the onion is cooking, mix the chili powder, garlic powder, onion powder, crushed red pepper flakes, paprika, cumin, and salt.
  3. Add the black beans into the skillet. Stir in the seasoning mix and water. Cook for about 5 minutes, until the sauce has thickened and the beans are heated through.
  4. To serve, fill bowls with rice. Top with some of the black bean/onion mixture, corn, and avocado.